Skip to content
Insporta Book

Diagrams

The drawn figures behind the guides

49 drawn figures from the Insporta Book: pitches, courts, fields and race courses that show one rule or one tactical idea each, with the guide they belong to. Every figure is an SVG you can download; the caption says what to look at, the guide says why.

Football

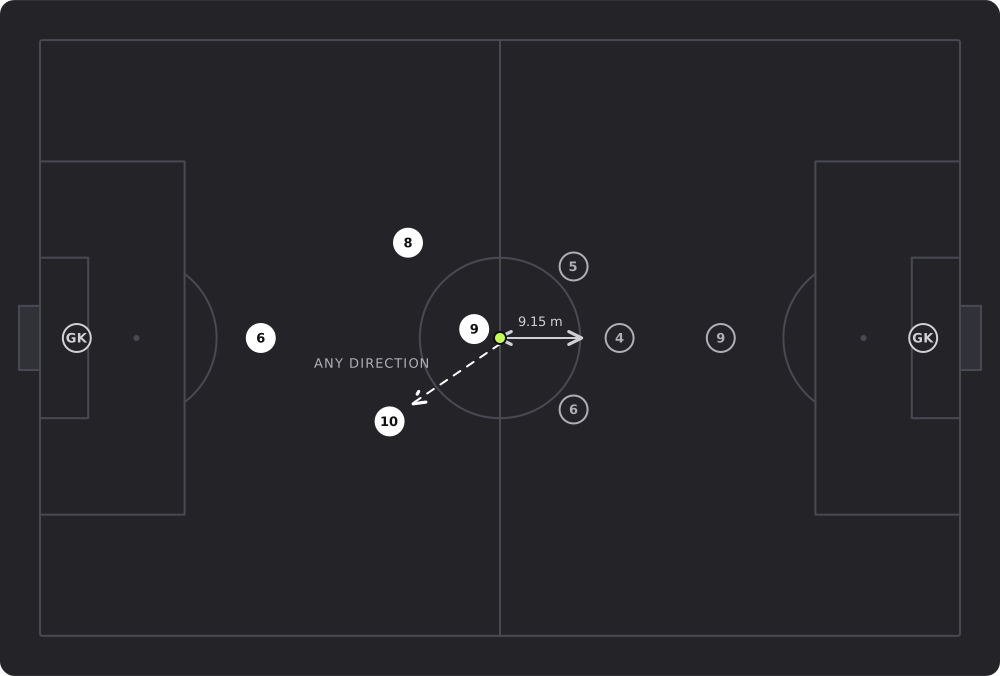
The kick-off: own halves, opponents outside the centre circle, ball in any directionA football pitch seen from above at a kick-off, the kicking team attacking to the right. The ball sits on the centre mark, every player of both teams is inside their own half, and the opponents stand outside the centre circle, 9.15 m from the ball. A dashed arrow shows the kicker playing the ball backwards to a team-mate: since 2016 the ball may go in any direction.GK681094569GKANY DIRECTION9.15 m
The kick-off: own halves, opponents outside the centre circle, ball in any direction. Every player in their own half, opponents outside the centre circle, and the ball in play once it is kicked and clearly moves, in any direction.SVG

Law 8: The Start and Restart of Play · The kick-off

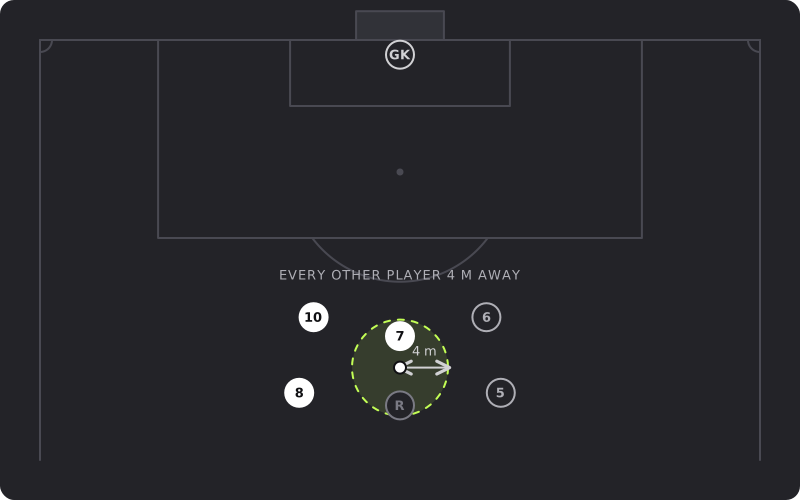
The dropped ball: one player receives it, everyone else at least 4 m awayA view of one end of a football pitch from above. The referee stands over the ball and drops it for a single player, who waits just in front of him. A dashed circle 4 m around the ball contains nobody else: two team-mates and two opponents stand outside it, as every other player must until the ball touches the ground.R781056GK4 mEVERY OTHER PLAYER 4 M AWAY
The dropped ball: one player receives it, everyone else at least 4 m away. The ball is dropped for one player; every other player, team-mate or opponent, stays at least 4 m from it until it touches the ground.SVG

Law 8: The Start and Restart of Play · The dropped ball

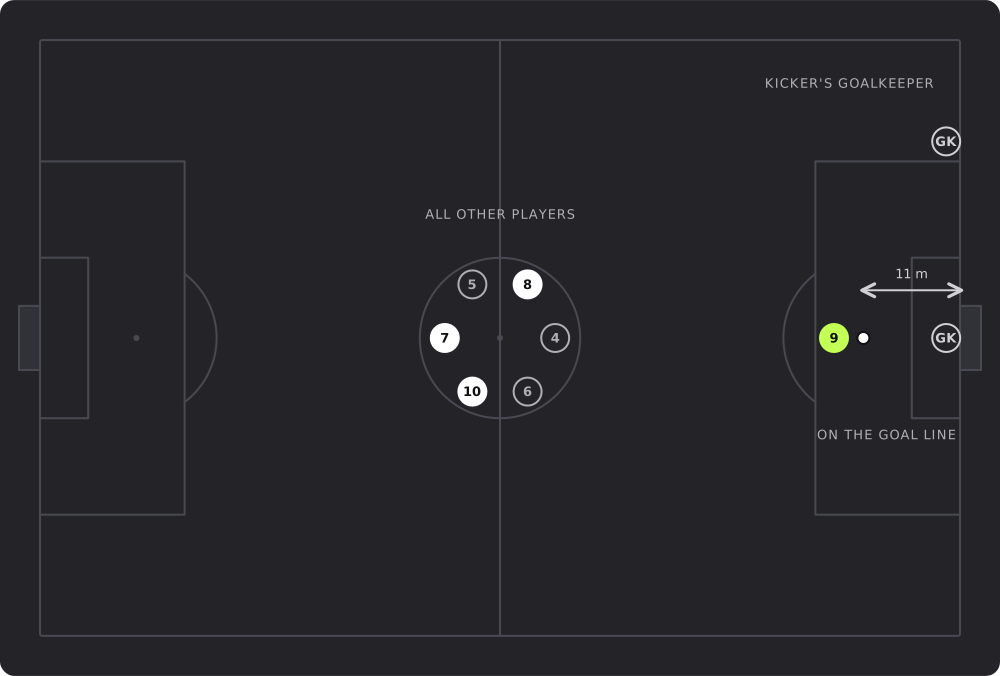
Kicks from the penalty mark: where everyone standsA football pitch seen from above during kicks from the penalty mark, all taken at the right-hand goal. The kicker faces the ball on the penalty mark, 11 m from the goal line. The defending goalkeeper stands on the goal line between the posts. The kicker's own goalkeeper waits on the goal line outside the penalty area, where the area's boundary meets the line. Every other eligible player is inside the centre circle.74581069GKGKALL OTHER PLAYERS11 mON THE GOAL LINEKICKER'S GOALKEEPER
Kicks from the penalty mark: where everyone stands. Only the kicker and the two goalkeepers are outside the centre circle: one keeper on the goal line between the posts, the other on the goal line where it meets the penalty area.SVG

Law 10: Determining the Outcome of a Match · Kicks from the penalty mark

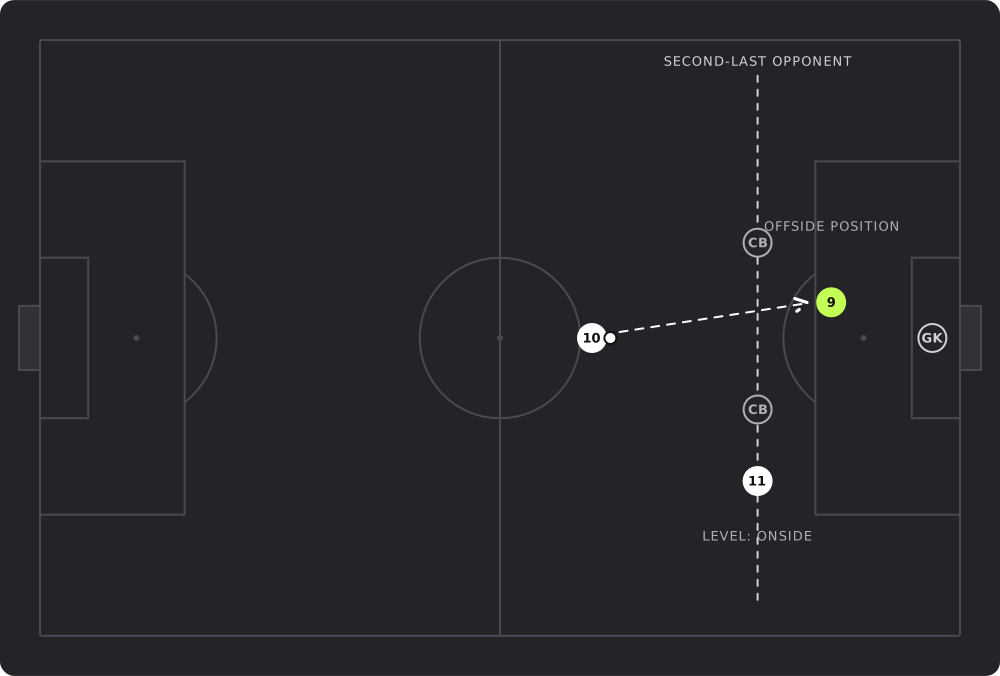
The offside position: nearer to the goal line than the ball and the second-last opponentA football pitch seen from above, attacking to the right. A dashed line runs across the pitch level with the second-last defender. The attacker marked 9 stands beyond that line and beyond the ball at the moment the pass is played, so he is in an offside position. A second attacker, level with the second-last defender, is not.GKCBCB10911SECOND-LAST OPPONENTOFFSIDE POSITIONLEVEL: ONSIDE
The offside position: nearer to the goal line than the ball and the second-last opponent. Level with the second-last opponent is onside. Any part of the head, body or feet beyond both the ball and that opponent is an offside position.SVG

Law 11: Offside · The offside position

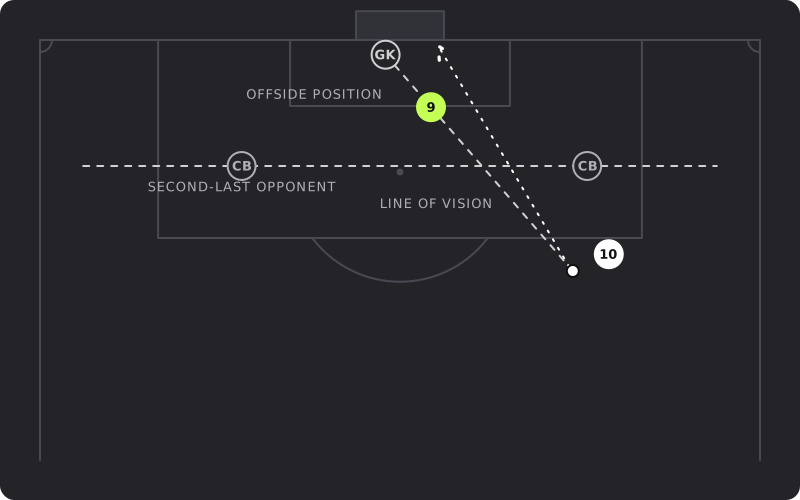
Interfering with an opponent: obstructing the goalkeeper's line of visionA view of the penalty area from above, goal at the top. An attacker shoots from the edge of the area. His team-mate marked 9 is in an offside position inside the goal area and stands directly on the dashed line between the ball and the goalkeeper, blocking the goalkeeper's view of the shot. That is interfering with an opponent, so the goal is disallowed even though 9 never touches the ball.CBCBGK910SECOND-LAST OPPONENTOFFSIDE POSITIONLINE OF VISION
Interfering with an opponent: obstructing the goalkeeper's line of vision. A player in an offside position who clearly obstructs an opponent's line of vision is interfering with an opponent: an offside offence without touching the ball.SVG

Law 11: Offside · The offside offence

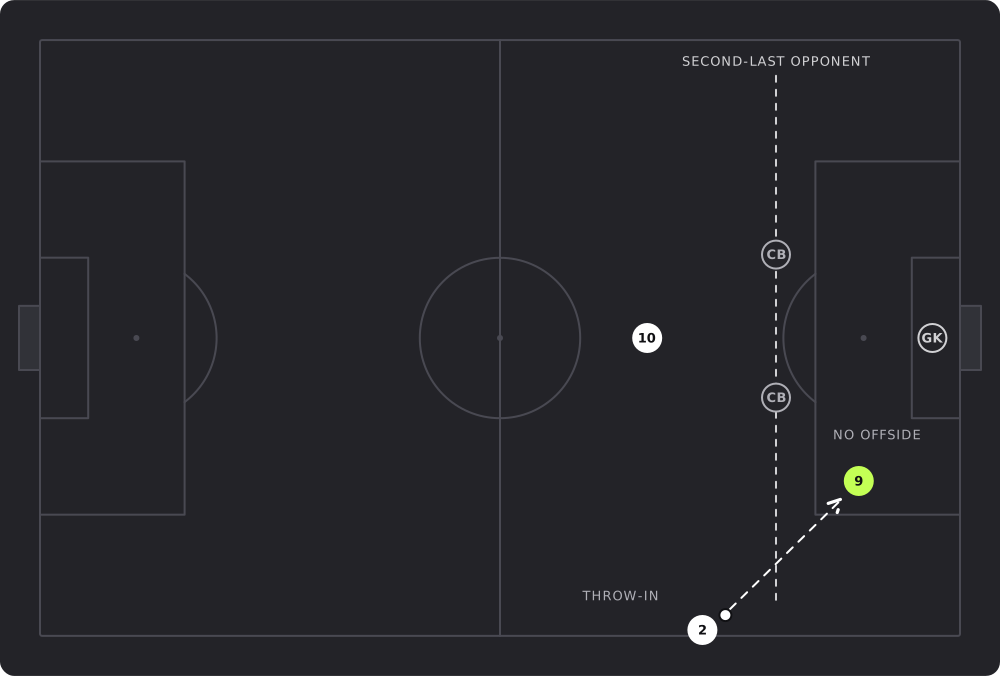
No offside offence when the ball comes directly from a throw-inA football pitch seen from above, attacking to the right. A player takes a throw-in from the touchline level with the penalty area. The team-mate marked 9 waits inside the area, beyond the second-last defender and beyond the ball, and receives the throw directly. There is no offside offence, because the ball came straight from a throw-in; the same exemption applies to a goal kick and a corner kick.GKCBCB1029SECOND-LAST OPPONENTTHROW-INNO OFFSIDE
No offside offence when the ball comes directly from a throw-in. Receiving the ball directly from a throw-in, a goal kick or a corner kick is never an offside offence, whatever the receiver's position.SVG

Law 11: Offside · When there is no offside offence

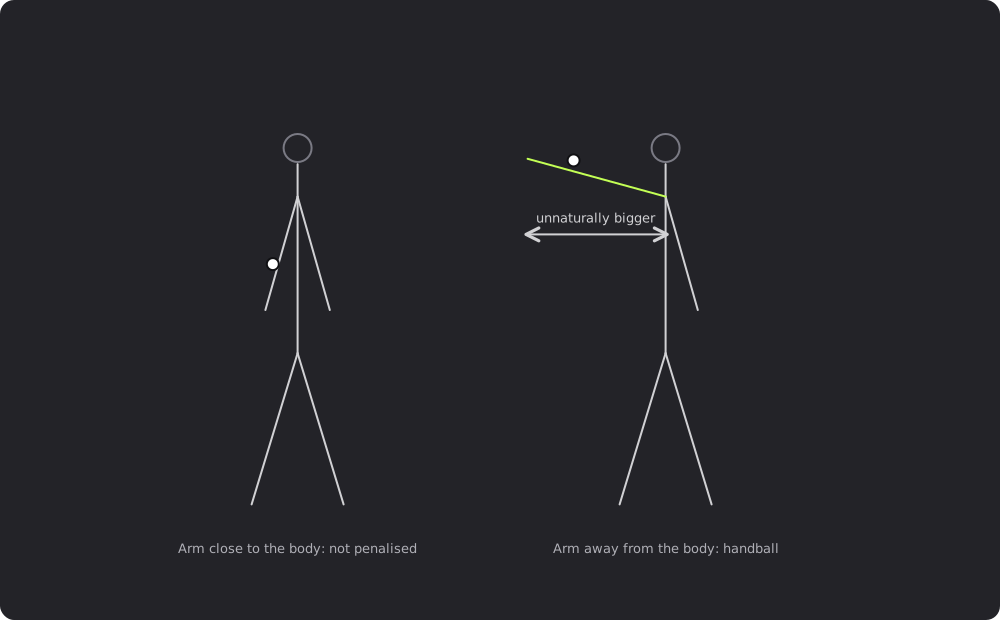
Handball: the arm position that makes the body unnaturally biggerTwo figures of a player drawn as simple lines, side by side, each struck by a ball on the arm. On the left the arms hang close to the body: not an offence. On the right one arm is stretched out sideways, away from the body, and the ball strikes it: that arm position is not a consequence of the player's movement and makes the body unnaturally bigger, so it is handball whether or not the touch was deliberate.Arm close to the body: not penalisedunnaturally biggerArm away from the body: handball
Handball: the arm position that makes the body unnaturally bigger. The test is justification, not height: an arm in a position that is not a consequence of the body's movement makes the body unnaturally bigger.SVG

Law 12: Fouls and Misconduct · Handball

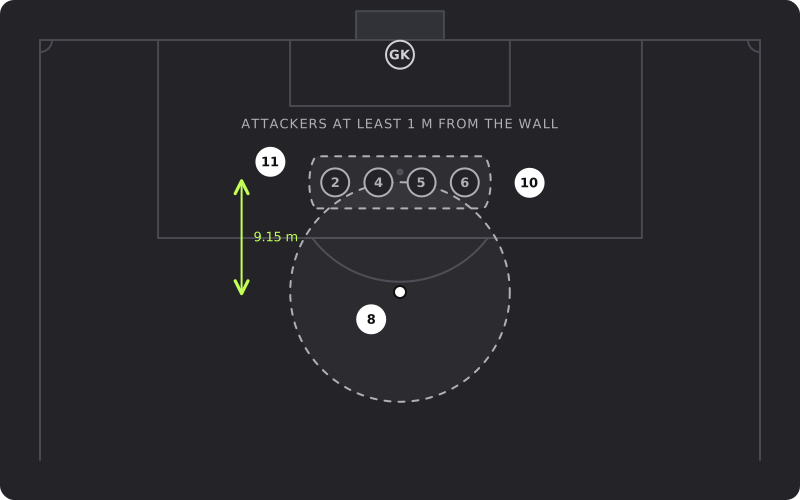
The free kick: opponents 9.15 m away, attackers 1 m from a wall of three or moreA view of the penalty area from above, goal at the top. A free kick is taken from just outside the area. A dashed circle 9.15 m around the ball shows the distance every opponent must keep; four defenders form a wall on its edge. A dashed box 1 m around the wall shows the space the attackers must not enter while the wall has three or more players: two attackers stand outside it.824561011GK9.15 mATTACKERS AT LEAST 1 M FROM THE WALL
The free kick: opponents 9.15 m away, attackers 1 m from a wall of three or more. Opponents stay at least 9.15 m from the ball until it is in play, and attackers stay at least 1 m from a wall of three or more defenders.SVG

Law 13: Free Kicks · Procedure and positions

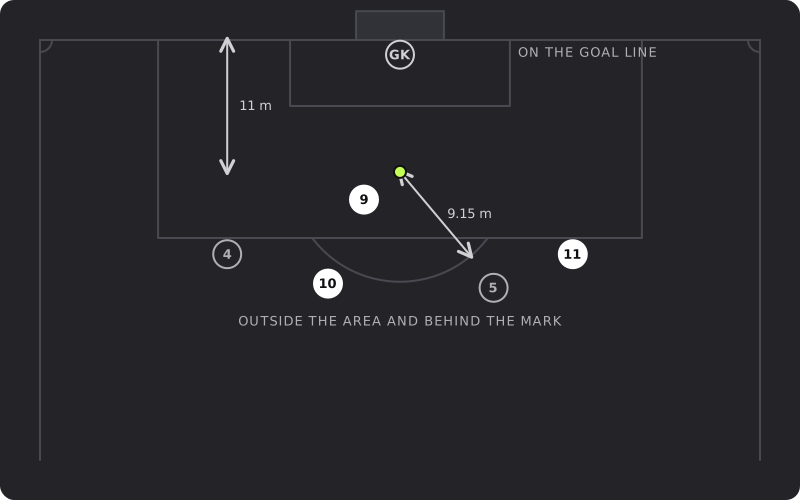
The penalty kick: ball on the mark, goalkeeper on the line, everyone else outsideA view of the penalty area from above, goal at the top. The ball rests on the penalty mark, 11 m from the goal line, with the kicker beside it. The goalkeeper stands on the goal line between the posts, facing the kicker. Every other player is outside the penalty area, behind the penalty mark and at least 9.15 m from it, which is why the arc on the edge of the area is drawn.1054119GKOUTSIDE THE AREA AND BEHIND THE MARK9.15 m11 mON THE GOAL LINE
The penalty kick: ball on the mark, goalkeeper on the line, everyone else outside. Ball on the mark, keeper on the line between the posts, everyone else outside the area, behind the mark and at least 9.15 m from it until the ball is kicked.SVG

Law 14: The Penalty Kick · Award and procedure

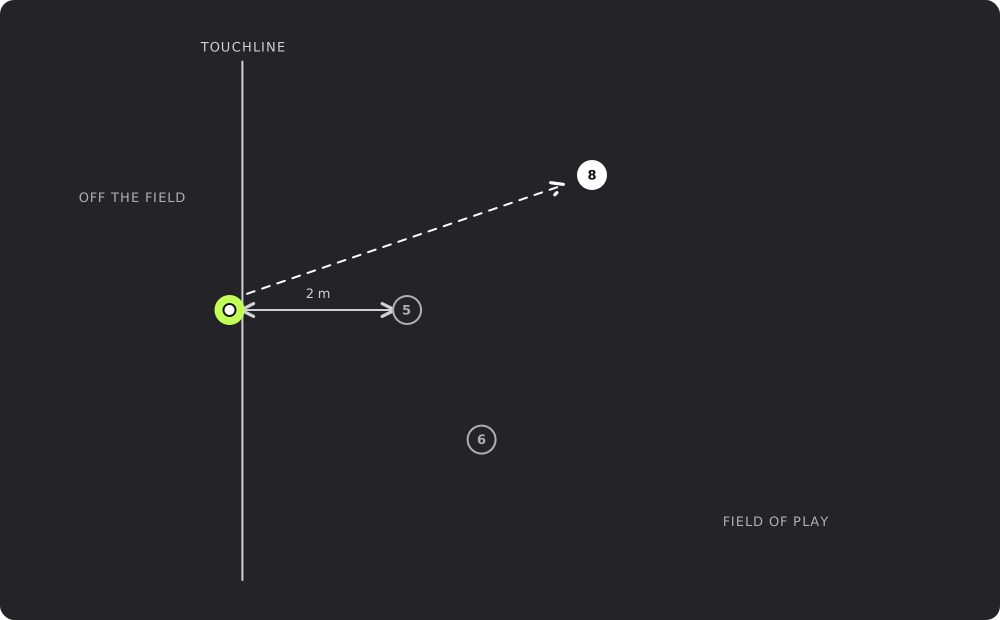
The throw-in: feet on or behind the touchline, opponents 2 m awayA close-up of the touchline seen from above, the field of play to the right. The thrower stands on the line facing the field with the ball held over the head; part of each foot is on the line or on the ground outside it. The nearest opponent waits 2 m from the point where the throw is taken, and a dashed arrow shows the ball thrown to a team-mate inside the field.2568TOUCHLINEOFF THE FIELDFIELD OF PLAY2 m
The throw-in: feet on or behind the touchline, opponents 2 m away. Part of each foot on the touchline or on the ground outside it, facing the field, both hands from behind and over the head; opponents at least 2 m from the point of the throw.SVG

Law 15: The Throw-In · The procedure

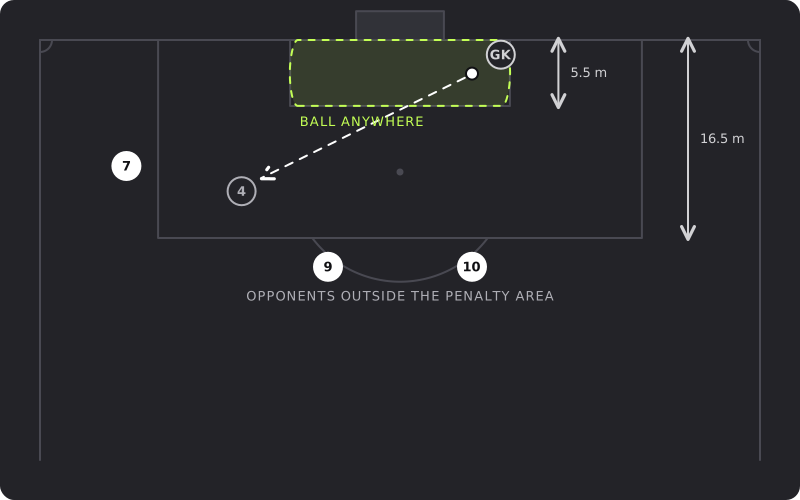
The goal kick: ball anywhere in the goal area, opponents outside the penalty areaA view of the penalty area from above, goal at the top. The ball is placed inside the goal area, the small box 5.5 m deep in front of the goal, and the goalkeeper kicks it to a team-mate who is still inside the penalty area, 16.5 m deep. Three opponents wait outside the penalty area. The ball is in play as soon as it is kicked and clearly moves; it no longer has to leave the area.91074GKBALL ANYWHERE16.5 m5.5 mOPPONENTS OUTSIDE THE PENALTY AREA
The goal kick: ball anywhere in the goal area, opponents outside the penalty area. Kicked from any point inside the goal area, in play the moment it is kicked and clearly moves, with all opponents outside the penalty area until then.SVG

Law 16: The Goal Kick · The procedure

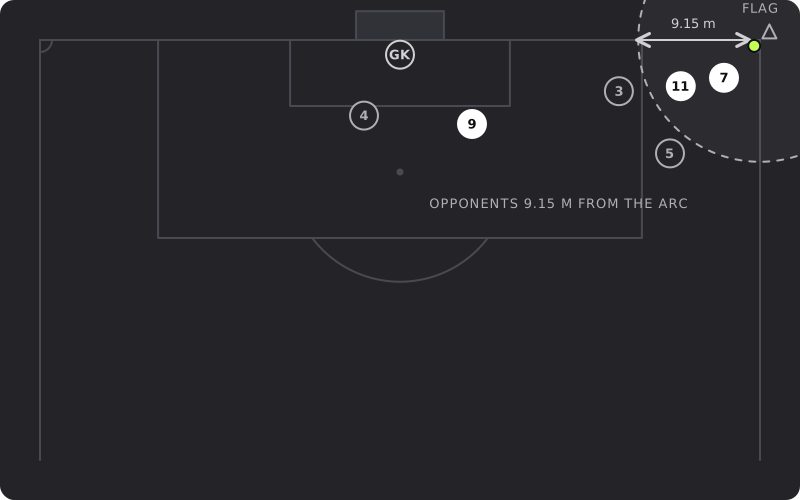
The corner kick: ball in the arc, flagpost in place, opponents 9.15 m from the arcA view of the penalty area from above, goal at the top, with the corner kick taken from the right-hand corner. The ball sits inside the 1 m corner arc beside the corner flagpost, which is not moved. A dashed quarter circle shows the 9.15 m that every opponent must keep from the arc, measured from the arc and not from the ball, until the ball is kicked and clearly moves. Team-mates may stand anywhere, including next to the taker for a short corner.7115394GK9.15 mOPPONENTS 9.15 M FROM THE ARCFLAG
The corner kick: ball in the arc, flagpost in place, opponents 9.15 m from the arc. The ball is placed in the corner arc, the flagpost stays put, and opponents keep at least 9.15 m from the arc until the ball is kicked and clearly moves.SVG

Law 17: The Corner Kick · The procedure

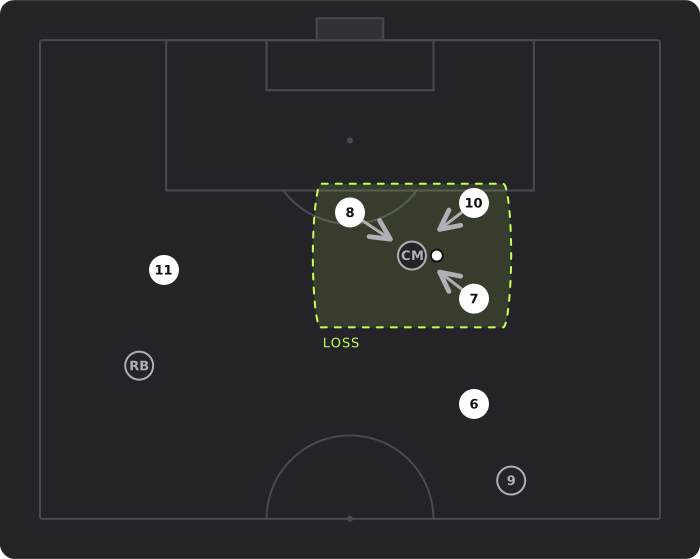
Counterpressing: the seconds after the ball is lostA football pitch seen from above, attacking goal at the top. The white team has just lost the ball inside the opposition half: the opponent who won it stands at the centre of a dashed zone marked loss, and three white players within a few metres of him all run at the ball at once. A fourth white player stands in the passing lane to the lone opposition striker near the halfway line, while the far flank is left uncovered.CM81076911RBLOSS
Counterpressing: the seconds after the ball is lost. Short distances in possession mean pressure arrives within seconds of the loss, before the opponent's shape can reorganise.SVG

Level 5: Upper-Intermediate · Pressing Triggers & Gegenpressing · Test 2: Principles & Triggers

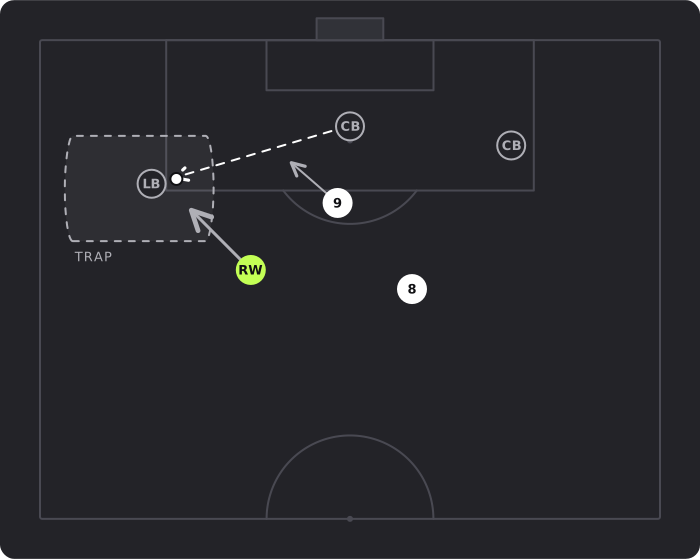
The square pass to a full-back as a pressing triggerA football pitch seen from above, attacking goal at the top. The opposition centre-back plays a square pass to the left-back, who receives facing his own touchline. The pressing winger arrives on the full-back's outside shoulder while the striker screens the pass back to the centre-back, so the only options left are the touchline or a long ball.CBLBCBRW98TRAP
The square pass to a full-back as a pressing trigger. The square pass turns the receiver toward the touchline: that is the moment the press starts.SVG

Level 5: Upper-Intermediate · Pressing Triggers & Gegenpressing · Test 4: Reading the Triggers

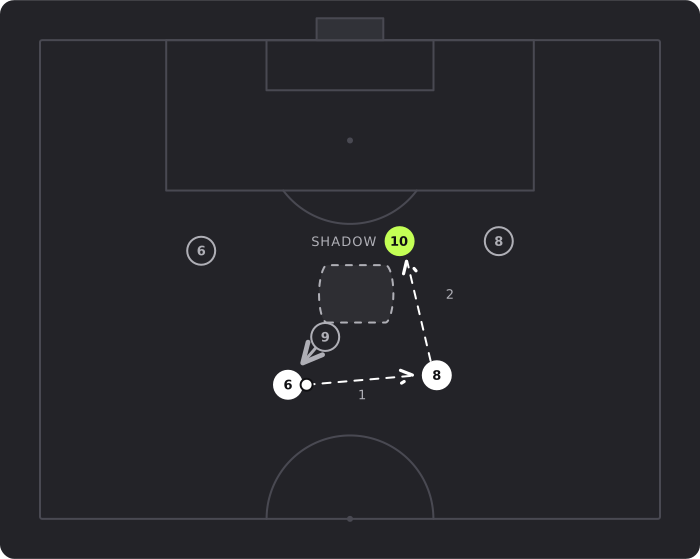
The third man: around the cover shadow, not through itA football pitch seen from above, attacking goal at the top. The white player 6 has the ball; an opposition presser runs at him and his cover shadow, drawn as a dashed patch behind him, screens the direct pass to the white 10 between the lines. So 6 plays sideways to 8 (pass 1) and 8 plays first time into 10 (pass 2), the ball going around the screen faster than the presser can shift.6981068SHADOW12
The third man: around the cover shadow, not through it. The direct pass is screened, so the ball goes round the presser through a second player and reaches the third man before the shadow can move.SVG

Level 5: Upper-Intermediate · Possession Philosophies · Test 4: Solving the Game with the Ball

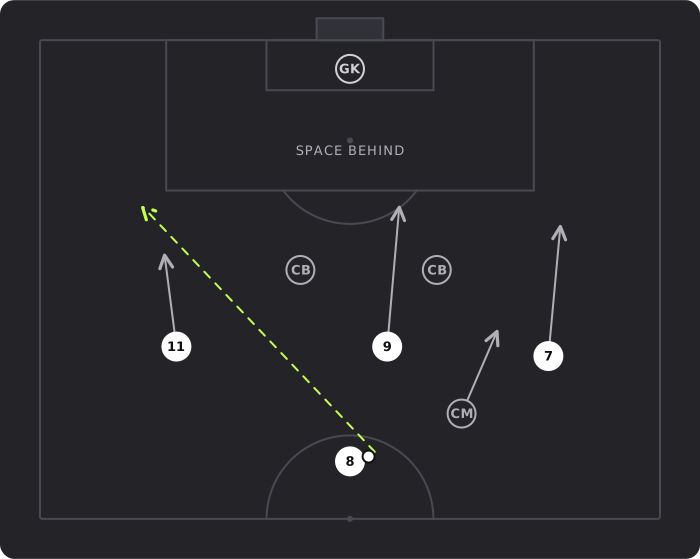
The counter-attack: a pass into the space ahead of the runnerA football pitch seen from above, attacking goal at the top. The white 8 has just won the ball near the halfway line and plays a long pass into the space behind the defence, ahead of the left-sided runner 11 rather than to his feet. Three white runners in three separate corridors, 11, 9 and 7, attack the space behind only two opposition centre-backs while one opposition midfielder chases back.81197CBCBCMGKSPACE BEHIND
The counter-attack: a pass into the space ahead of the runner. The transition pass is played into the space ahead of the runner, and three runners in separate corridors give two defenders more problems than they can solve.SVG

Level 5: Upper-Intermediate · Direct & Counter-Attacking Football · Test 2: Principles of Verticality

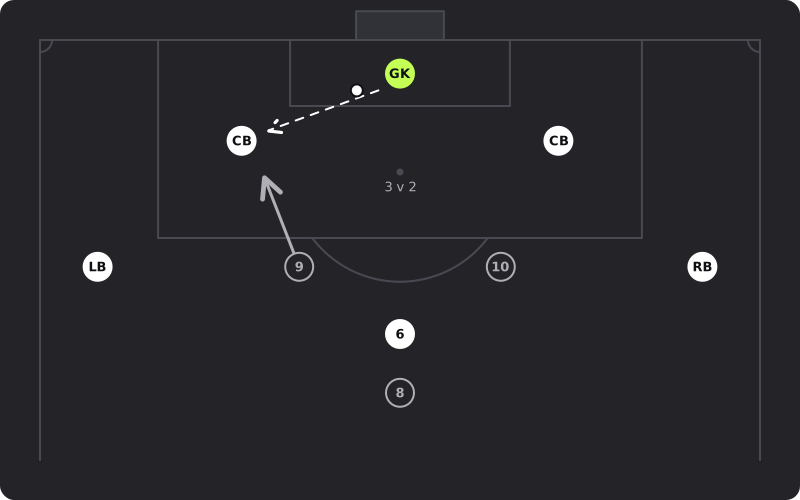
The goal kick since 2019: three builders against two pressersA close-up of the white team's own penalty area, its goal at the top. The goalkeeper takes a short goal kick to a centre-back who receives inside the penalty area, which the 2019-20 law change allows; the other centre-back waits on the far side of the box. Two opposition forwards press from outside the area, one jumping onto the receiver, while a third opponent marks the white pivot, so the goalkeeper is the spare man: three against two in the first line.GKCBCBLBRB691083 v 2
The goal kick since 2019: three builders against two pressers. Since 2019 the ball is in play from the kick, so the centre-backs receive inside the box and the goalkeeper makes it three builders against two pressers: the +1.SVG

Level 5: Upper-Intermediate · Playing Out from the Back · Test 2: The Grammar of Build-Up

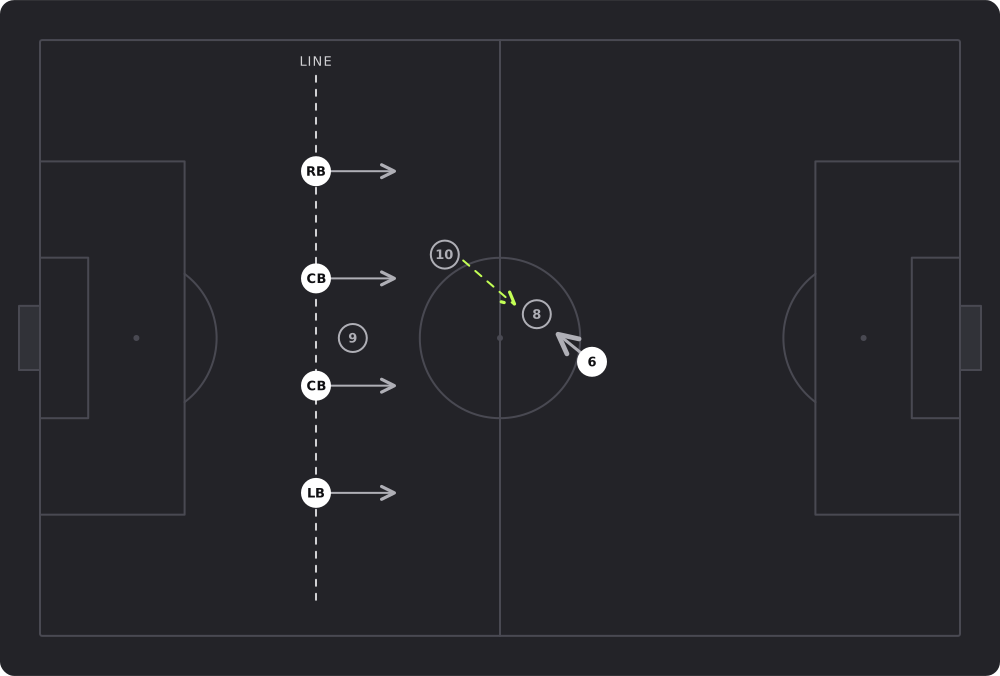
The offside trap: the line steps up on the backward passA football pitch seen from above; the white team defends the goal at the left, so the opponents attack to the left. An opposition 10 plays the ball backwards to a team-mate who is immediately pressed by the white 6: that is the trigger. The white back four, standing on a dashed line, all step forward together at the moment the pass is played, leaving the opposition 9, who was level with them, behind the line.RBCBCBLB91086LINE
The offside trap: the line steps up on the backward pass. The backward pass to a carrier under pressure is the trigger: the line steps up together on the passer's foot and the striker is left behind it.SVG

Level 5: Upper-Intermediate · Defensive Schemes & The Offside Trap · Test 2: Roles in the Block

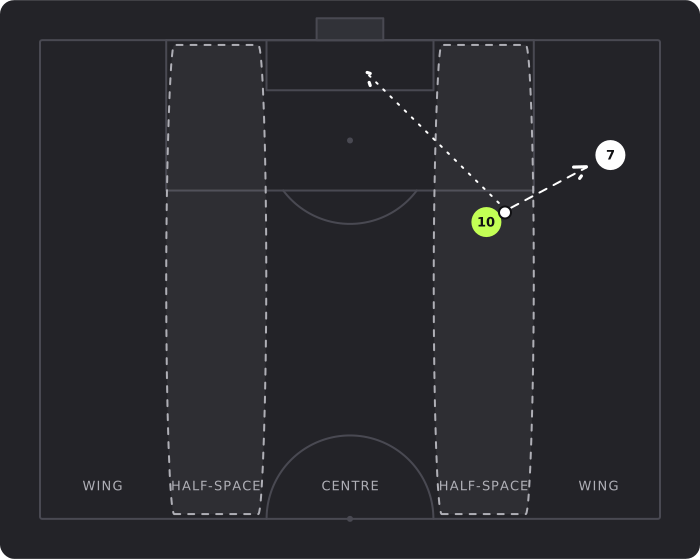
The five vertical lanes: wings, half-spaces and the centreA football pitch seen from above, attacking goal at the top, divided into five vertical lanes: a wing on each side, a shaded half-space inside each wing, and the centre between them, with the lane boundaries on the lines of the penalty area and the goal area. The white 10 has the ball in the right half-space just outside the box and has both a shooting angle at goal and a passing angle out to the winger 7 on the touchline.107WINGHALF-SPACECENTREHALF-SPACEWING
The five vertical lanes: wings, half-spaces and the centre. Five lanes: two wings, two half-spaces and the centre. From the half-space the same player has a shooting angle to goal and a passing angle to the wing.SVG

Level 5: Upper-Intermediate · Attacking Geometry: Half-Spaces & Width

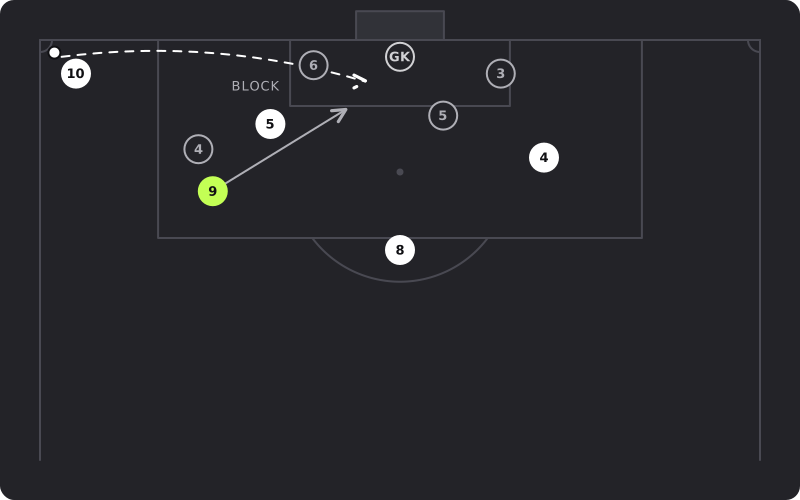
A corner routine: the blocker frees the runner at the near postA close-up of the penalty area, goal at the top, at an in-swinging corner from the left. The white 9 starts outside the six-yard box and runs to the near post as the ball is struck; the opponent marking him would follow, but the white 5 stands in his path as a blocker, so the runner arrives at the near post with a yard of separation. Three opposition defenders and the goalkeeper hold zones in front of goal, and a white player waits on the edge of the box for the clearance.10945GK65384BLOCK
A corner routine: the blocker frees the runner at the near post. The blocker stands in the marker's path to the near post, so the runner arrives at the six-yard box with a yard of separation when the in-swinger lands.SVG

Level 5: Upper-Intermediate · Set-Piece Design & Dead-Ball Specialists · Test 2: The Grammar of Set Pieces

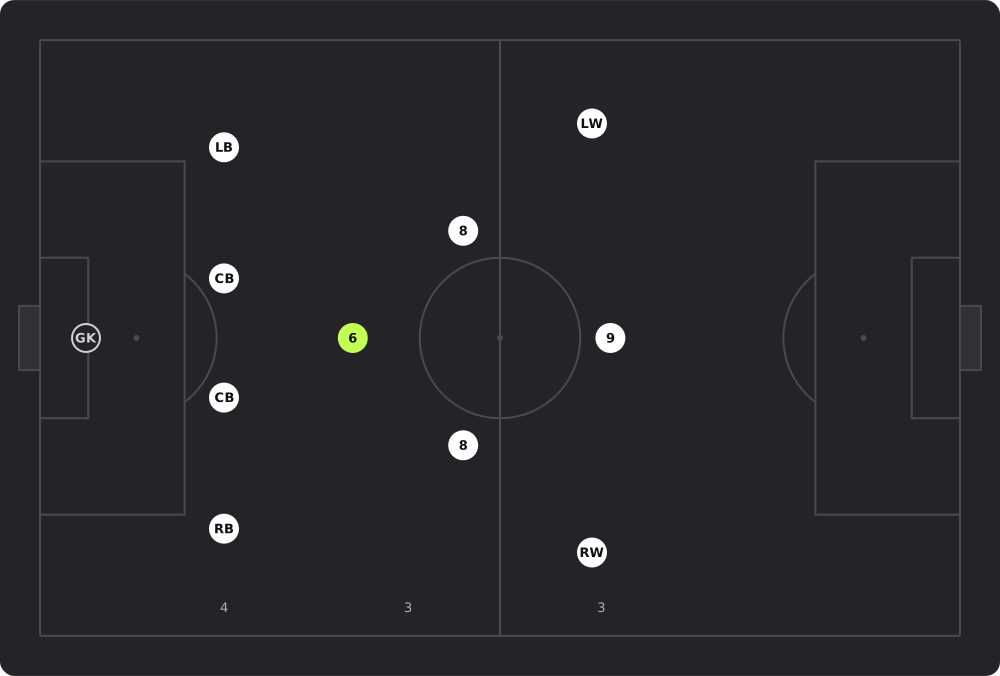
Reading a formation: the 4-3-3, back to front, goalkeeper excludedA football pitch seen from above, the white team attacking to the right. From its own goal outwards the team stands in three lines: a back four of two full-backs and two centre-backs, a midfield three made of a single pivot with two 8s ahead of him, and a front three of two wingers and a striker. The numbers under each line read 4, 3 and 3, and the goalkeeper is not counted.GKLBCBCBRB688LW9RW433
Reading a formation: the 4-3-3, back to front, goalkeeper excluded. Read back to front with the goalkeeper excluded: four, then the single pivot with two 8s, then three forwards: a 4-3-3.SVG

Level 5: Upper-Intermediate · Formations & Their Logic

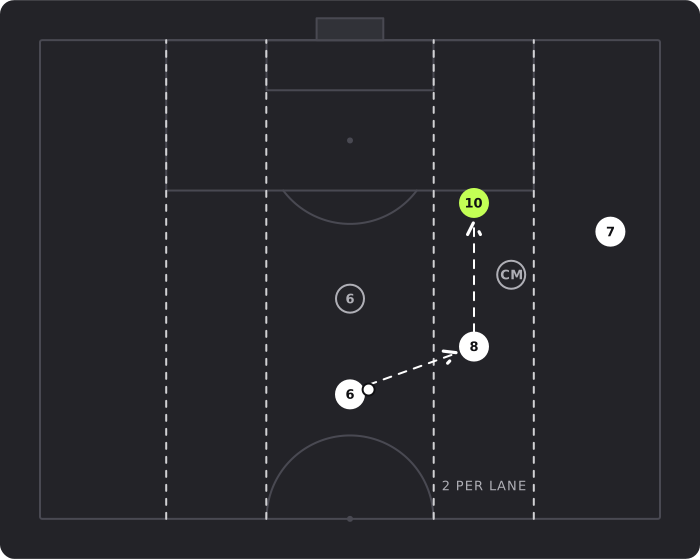
Two players in one lane, at different heightsA football pitch seen from above, attacking goal at the top, with dashed lines dividing it into five vertical lanes. The white 6 has the ball in the centre and passes to 8 in the right half-space; 8 and 10 share that lane at two different heights with an opposition midfielder standing between them, so the pass from 8 up the lane to 10 goes past a defender. The winger 7 holds the right wing alone.6810CM672 PER LANE
Two players in one lane, at different heights. Two players may share a lane, but at different heights, so the pass between them travels past a defender and eliminates him rather than passing nobody.SVG

Level 6: Advanced · Positional Play (Juego de Posición) · Test 2: Occupation rules in awkward moments

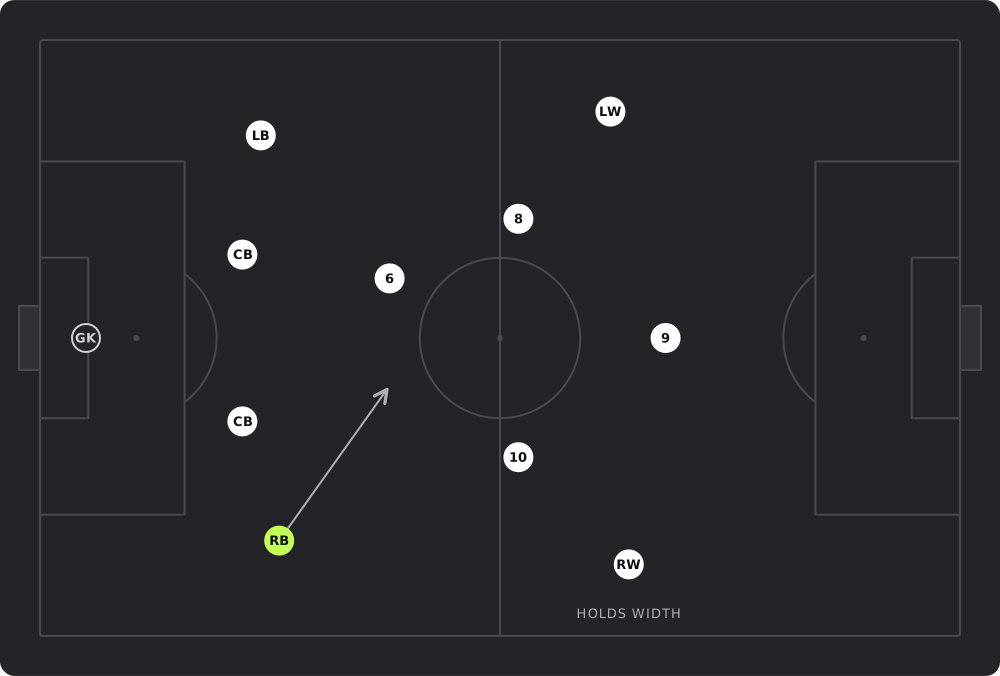
The inverted full-back: from the first line into midfieldA football pitch seen from above, the white team attacking to the right. The right-back leaves the back line and moves inside to stand beside the pivot, so the team builds with two centre-backs and two central midfielders while the left-back stays. The right winger stays on the touchline to hold the width alone, with the two 8s and the striker ahead of the ball.GKCBCBLBRB6810LW9RWHOLDS WIDTH
The inverted full-back: from the first line into midfield. The right-back steps inside beside the pivot, buying an extra midfielder from the first line, and the winger is left to hold the touchline alone.SVG

Level 6: Advanced · Wide Play and Role Inversion · Test 3: Inverted and false full-backs

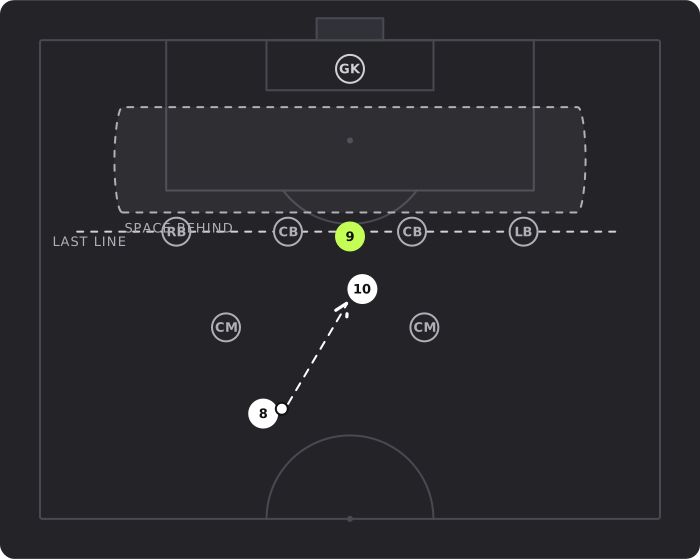
Pinning the last line: the striker stays level with the defendersA football pitch seen from above, attacking goal at the top. The white 9 stands level with the opposition back four, on the shoulder of a centre-back, so the defenders cannot step up without leaving the shaded space behind them to him. Because the line is held there, the space between it and the opposition midfield stays open, and the white 8 passes into 10 who receives in that gap.RBCBCBLB9GKCMCM810SPACE BEHINDLAST LINE
Pinning the last line: the striker stays level with the defenders. The striker stays level with the last line rather than coming to the ball, so the defenders cannot step up and the gap between the lines stays open for the 10.SVG

Level 6: Advanced · Striker Roles · Test 1: Pinning the last line

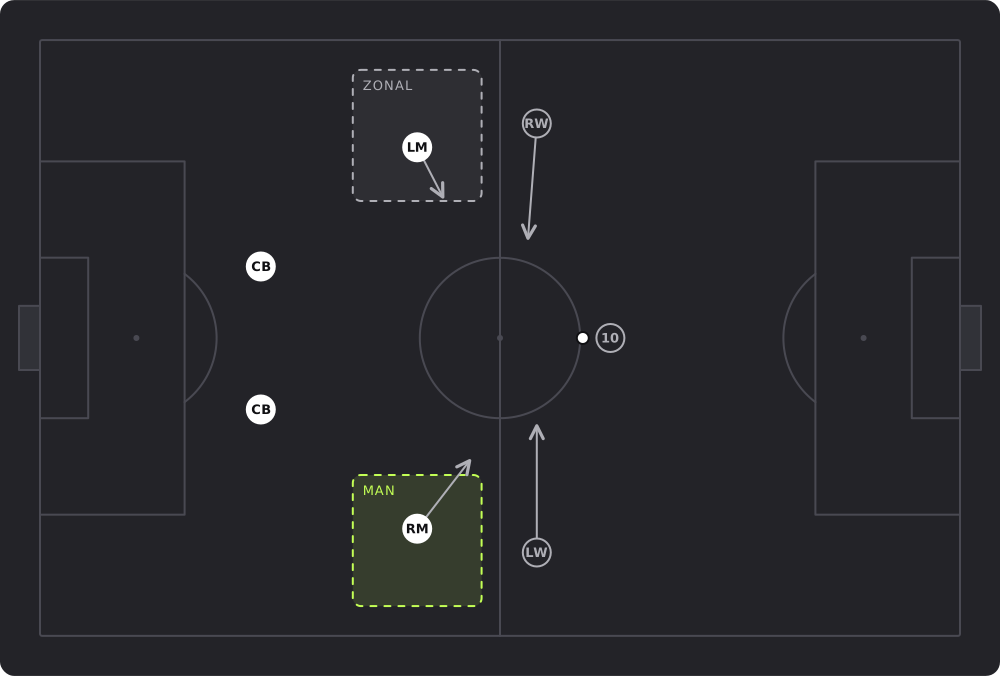
Zonal versus man-oriented: what moves the defenderA football pitch seen from above; the white team defends the goal at the left and the opponents, with the ball on the right, attack to the left. At the top of the picture an opposition winger drifts inside but the white left midfielder stays in his dashed zone and only shifts slightly towards the ball. At the bottom the other opposition winger makes the same move and the white right midfielder follows him, leaving his zone, drawn in lime, empty.LMRWRMLW10CBCBZONALMAN
Zonal versus man-oriented: what moves the defender. Zonal responsibility moves with the ball, man-orientation moves with the opponent: the left midfielder keeps his zone while the right one follows his man out of it and leaves the flank open.SVG

Level 6: Advanced · Marking Systems: Zonal, Man-Oriented and Hybrid · Test 2: What the defender watches

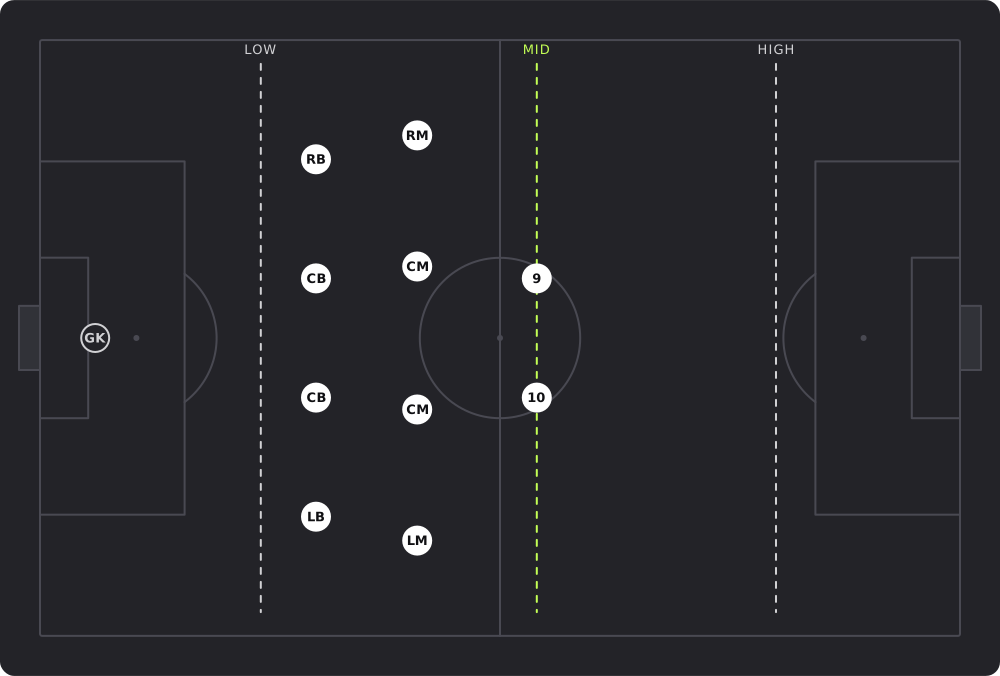
Block height: where the front line standsA football pitch seen from above; the white team defends the goal at the left. Three dashed lines across the pitch mark the three heights a block's front line can take: high, near the opponent's penalty area; mid, just past the halfway line; and low, at the edge of its own box. The white team is drawn as a 4-4-2 mid block with its two forwards standing on the mid line, its midfield four behind them and its back four in front of the goalkeeper.GKRBCBCBLBRMCMCMLM910HIGHMIDLOW
Block height: where the front line stands. Height is where the front line stands: at the opponent's box, at halfway or at its own box edge. The mid block trades some space behind for some territory in front.SVG

Level 6: Advanced · Blocks and Defensive Organisation · Test 1: What sets the height

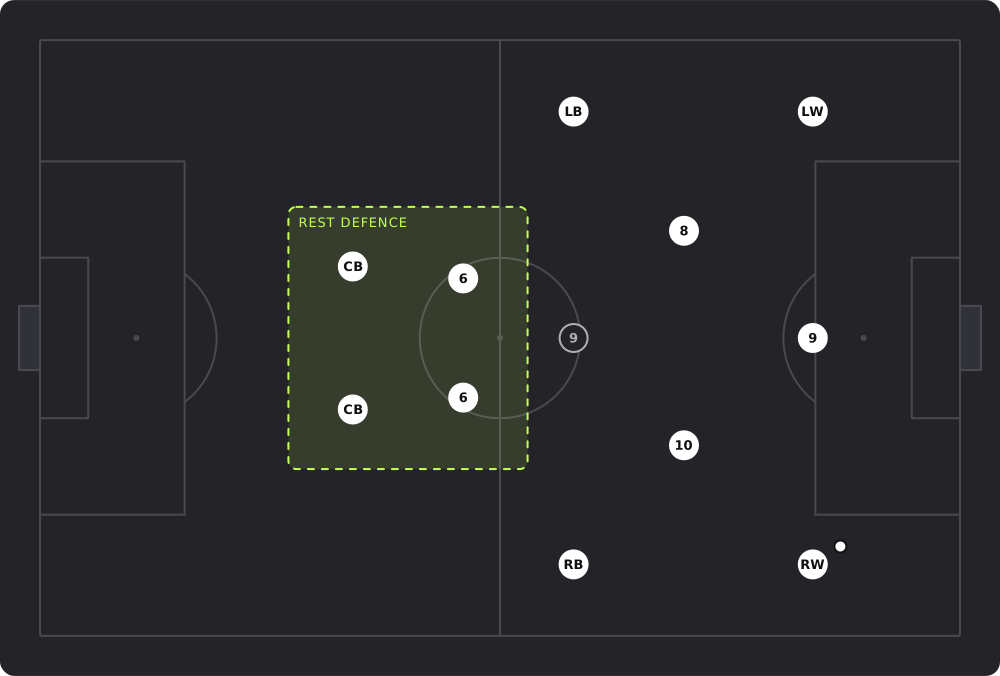
Rest defence: the double pivot and the centre-backs behind the attackA football pitch seen from above, the white team attacking to the right with the ball at the right winger's feet. While both full-backs push high and five players attack the last line, the two centre-backs and the two holding midfielders stay in a box behind the ball, shaded in lime and marked rest defence. The opposition striker who stays high as the counter-attacking outlet faces those four players before he can reach the open wide areas behind the full-backs.CBCB66LBRB810LW9RW9REST DEFENCE
Rest defence: the double pivot and the centre-backs behind the attack. While the full-backs push high, the two centre-backs and the double pivot stay in a box behind the ball, so a counter meets four players before it reaches the open wide areas.SVG

Level 6: Advanced · Midfield Structures: Pivots, Box and Rest Defence · Test 4: Rest defence

Cricket

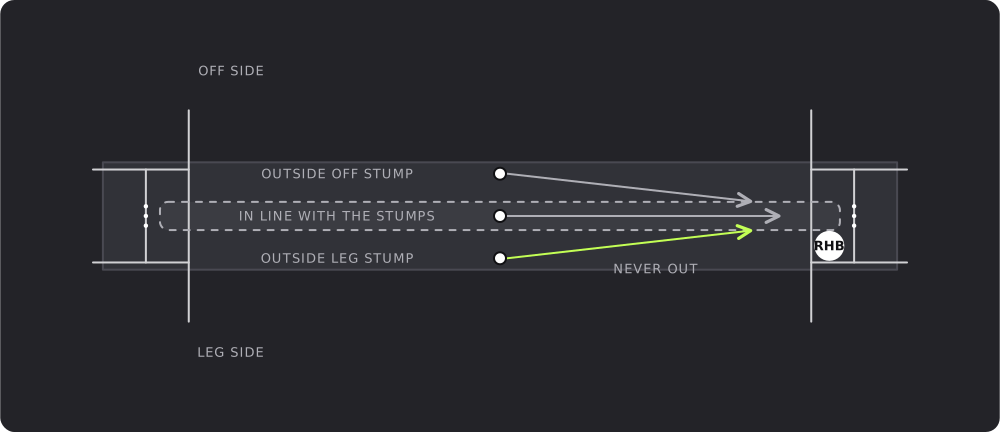
LBW and where the ball pitches: outside off, in line, outside legA cricket pitch seen from above, the bowler's end on the left and the striker's stumps on the right; the off side of the right-handed batter is at the top and the leg side at the bottom. A shaded band marks the line between the two wickets. Three balls pitch level with each other, one outside off stump, one in line and one outside leg stump, and each travels on toward the batter's pads. The outside-leg path is drawn in lime and marked never out.RHBOUTSIDE OFF STUMPIN LINE WITH THE STUMPSOUTSIDE LEG STUMPNEVER OUTOFF SIDELEG SIDE
LBW and where the ball pitches: outside off, in line, outside leg. A ball that pitches outside leg stump can never bring an LBW; one that pitches in line or outside off can, if it would go on to hit the stumps.SVG

Level 1: Beginner · Ways of Getting Out · Test 2: LBW in plain terms

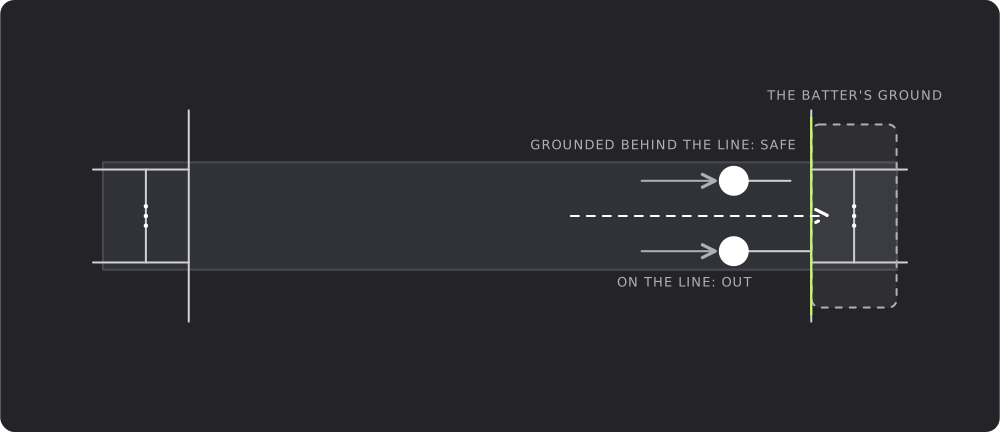
Making your ground: bat grounded behind the popping crease against bat on the lineClose-up of the striker's end of a cricket pitch, the stumps on the right and the popping crease drawn in lime 1.22 m in front of them; the batter's ground behind the crease is shaded. A throw comes in along the pitch as two batters slide their bats toward the line: the upper one has the bat grounded behind the line and is safe, the lower one has the bat only on the line and is out if the wicket is broken.THE BATTER'S GROUNDGROUNDED BEHIND THE LINE: SAFEON THE LINE: OUT
Making your ground: bat grounded behind the popping crease against bat on the line. The crease line is not part of the batter's ground: bat or body grounded behind it is safe when the wicket is broken; on the line is out.SVG

Level 1: Beginner · Ways of Getting Out · Test 3: Run out and stumped

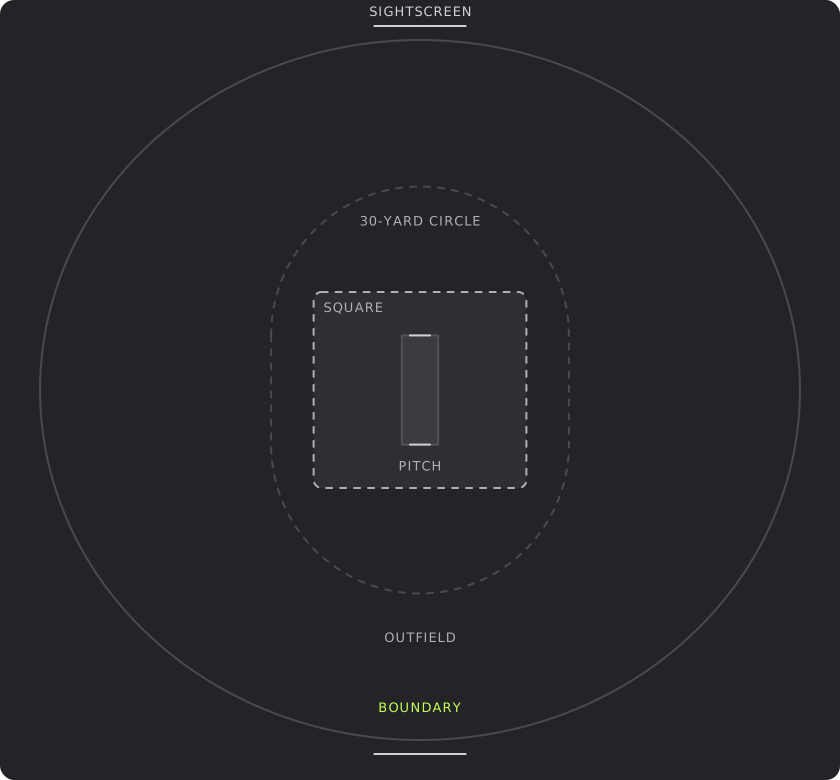
The ground: the square, the 30-yard circle, the outfield and the boundaryA cricket ground seen from above as an oval. The pitch runs vertically in the centre inside the square, the block of prepared strips; a dashed 30-yard circle surrounds it, the outfield lies between the circle and the boundary rope on the edge of the oval, and a sightscreen stands outside the boundary behind each end of the pitch.SQUAREPITCH30-YARD CIRCLEOUTFIELDBOUNDARYSIGHTSCREEN
The ground: the square, the 30-yard circle, the outfield and the boundary. The boundary must be agreed and marked, usually with a rope, but neither its distance nor the shape of the ground is laid down by the Laws.SVG

Level 1: Beginner · The Ground and the Kit · Test 1: The field and the boundary

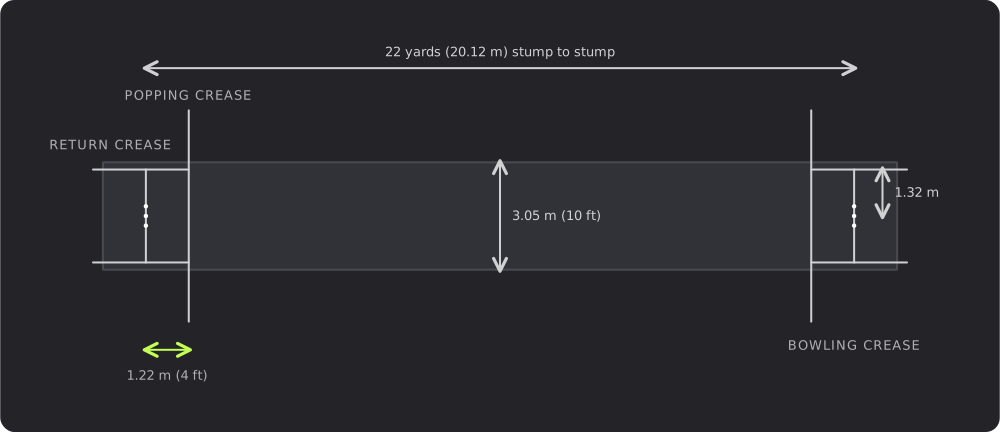
The pitch and its creases: 22 yards stump to stump, popping crease 1.22 m in frontA cricket pitch seen from above, the bowler's end on the left and the striker's end on the right. The two sets of stumps stand 22 yards (20.12 m) apart on the bowling creases and the pitch is 3.05 m (10 ft) wide. At each end the popping crease is drawn 1.22 m (4 ft) in front of the stumps, and the return creases run back from it 1.32 m either side of the middle stump.22 yards (20.12 m) stump to stump3.05 m (10 ft) 1.22 m (4 ft)1.32 mPOPPING CREASERETURN CREASEBOWLING CREASE
The pitch and its creases: 22 yards stump to stump, popping crease 1.22 m in front. Twenty-two yards stump to stump; the popping crease, four feet (1.22 m) in front of each wicket, is the line batters and bowlers alike are judged against.SVG

Level 1: Beginner · The Ground and the Kit · Test 2: The pitch and the creases

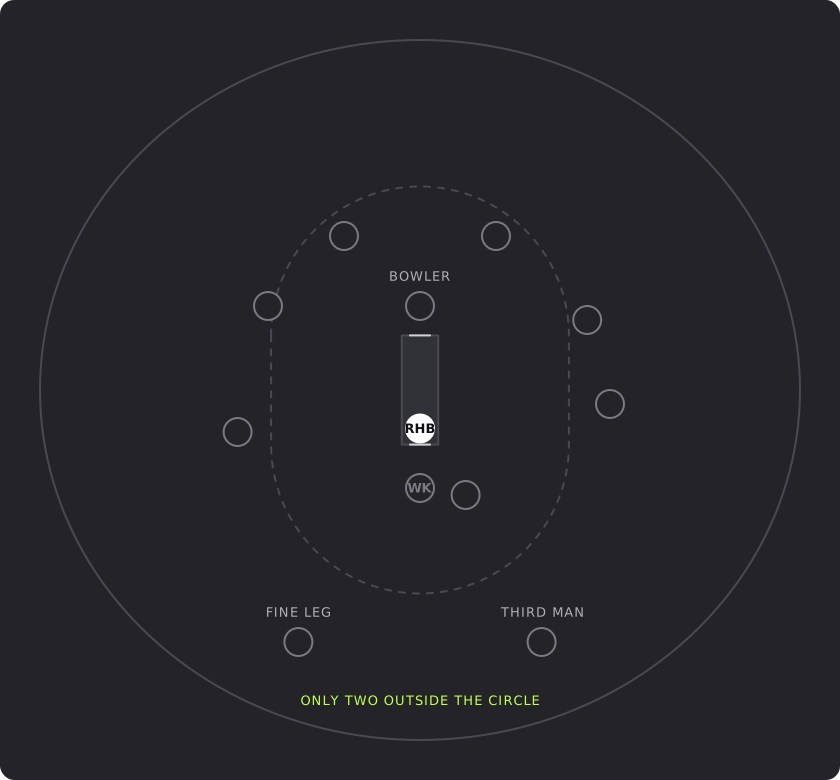
The first powerplay in a one-day international: only two fielders outside the circleA cricket field seen from above with the dashed 30-yard circle, the bowler at the top and a right-handed striker at the bottom. Nine fielders stand with the wicket-keeper: a slip, point, cover, mid-off, mid-on, midwicket and square leg are all inside the circle, and only third man and fine leg are outside it, back on the boundary, the most allowed in the first ten overs.RHBWKBOWLERTHIRD MANFINE LEGONLY TWO OUTSIDE THE CIRCLE
The first powerplay in a one-day international: only two fielders outside the circle. In the first ten overs of a fifty-over innings no more than two fielders may stand outside the thirty-yard circle; a third makes the delivery a no-ball.SVG

Level 2: Elementary · Match Regulations · Test 1: Powerplays in a one-day international

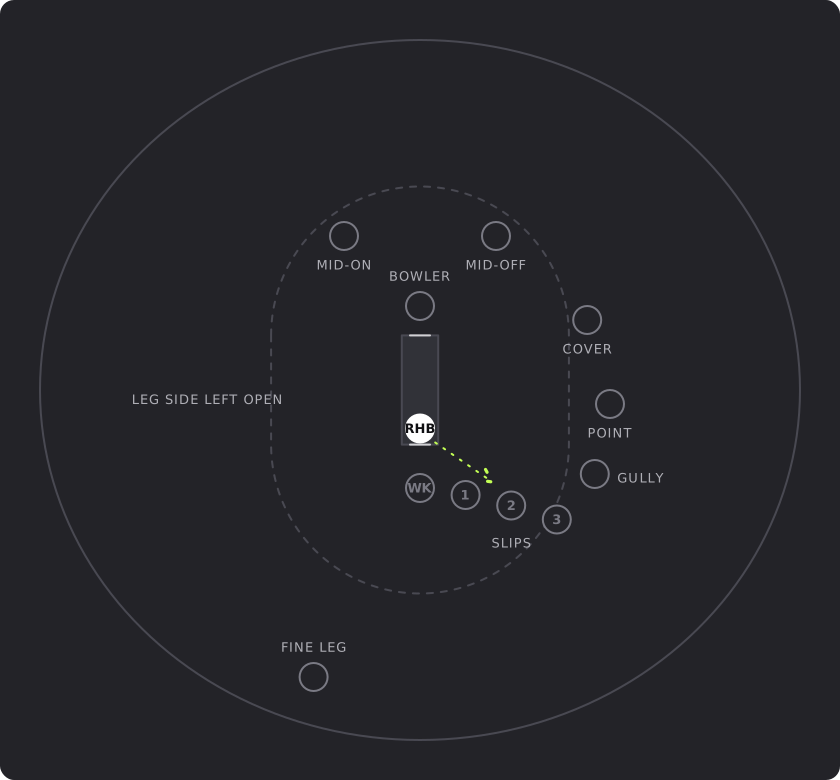
An attacking field for a new-ball pace bowler to a right-handerA cricket field seen from above, the bowler at the top and a right-handed striker at the bottom, off side to the right. Behind the bat the wicket-keeper and three slips fan out to the off side with a gully squarer still; point, cover and mid-off make up the off-side ring, mid-on is the only ring fielder on the leg side and fine leg the only fielder on the boundary. A lime dotted arrow shows an outside edge carrying to the slips.RHBWK123BOWLERSLIPSGULLYPOINTCOVERMID-OFFMID-ONFINE LEGLEG SIDE LEFT OPEN
An attacking field for a new-ball pace bowler to a right-hander. With the new ball the edge is the main chance, so the catchers stand where an outswinger's nick carries, behind the bat on the off side, and the leg side is left almost empty.SVG

Level 3: Pre-Intermediate · Pace Bowling · Test 5: Lines, lengths and fields

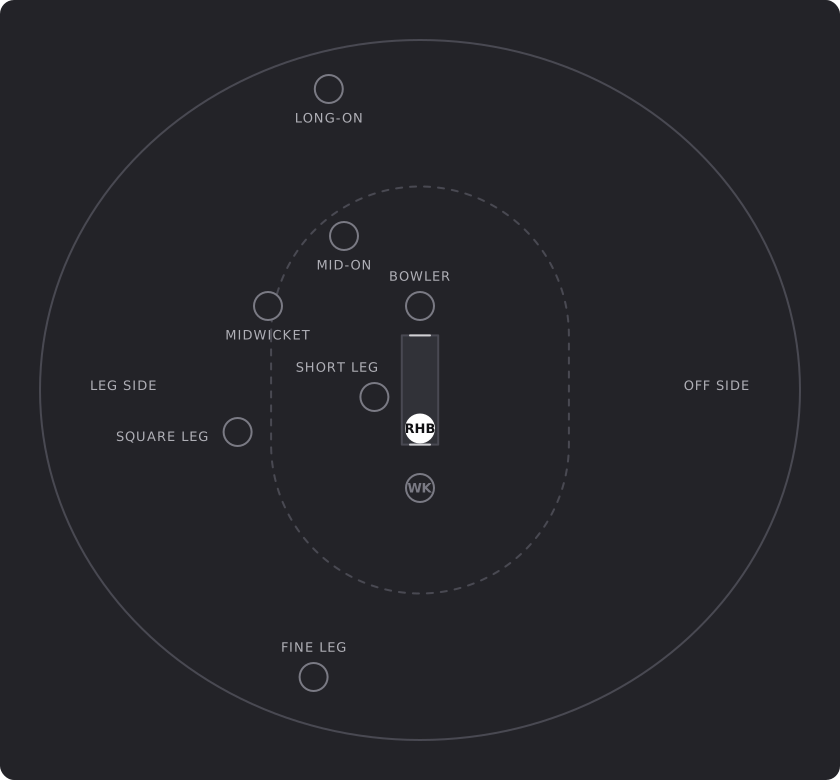
Leg-side fielding positions for a right-handed batterA cricket field seen from above, the bowler at the top and a right-handed striker at the bottom, so the leg side is the left half of the figure. Fine leg is deep on the boundary behind square, square leg is level with the batter on the ring, midwicket is in front of square, mid-on near the bowler and long-on on the straight boundary. Short leg crouches a couple of metres from the bat, just in front of square.RHBWKBOWLERFINE LEGSQUARE LEGMIDWICKETMID-ONLONG-ONSHORT LEGOFF SIDELEG SIDE
Leg-side fielding positions for a right-handed batter. The leg side is behind the right-hander's back: fine leg behind square, square leg level with him, midwicket and mid-on in front, and short leg close in for the bat-pad catch.SVG

Level 3: Pre-Intermediate · Fielding, Catching and Keeping · Test 1: The catching and fielding positions

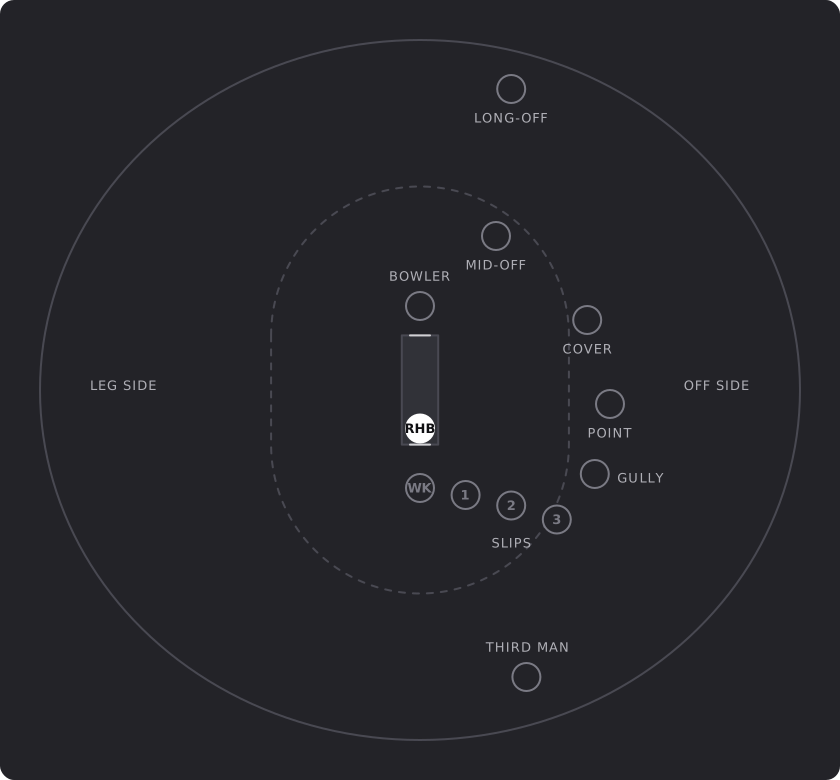
Off-side fielding positions for a right-handed batterA cricket field seen from above, the bowler at the top and a right-handed striker at the bottom, so the off side is the right half of the figure. Behind the bat stand the wicket-keeper and three slips fanning out to the off side, with gully squarer and wider and third man deep on the boundary behind them. Point is square of the wicket, cover in front of square, mid-off near the bowler and long-off on the straight boundary.RHBWK123BOWLERSLIPSGULLYPOINTCOVERMID-OFFLONG-OFFTHIRD MANOFF SIDELEG SIDE
Off-side fielding positions for a right-handed batter. Every name is fixed to the batter's stance: a right-hander faces the off side, so slips, gully and third man sit behind his bat and cover, mid-off and long-off in front of it.SVG

Level 3: Pre-Intermediate · Fielding, Catching and Keeping · Test 1: The catching and fielding positions

Futsal

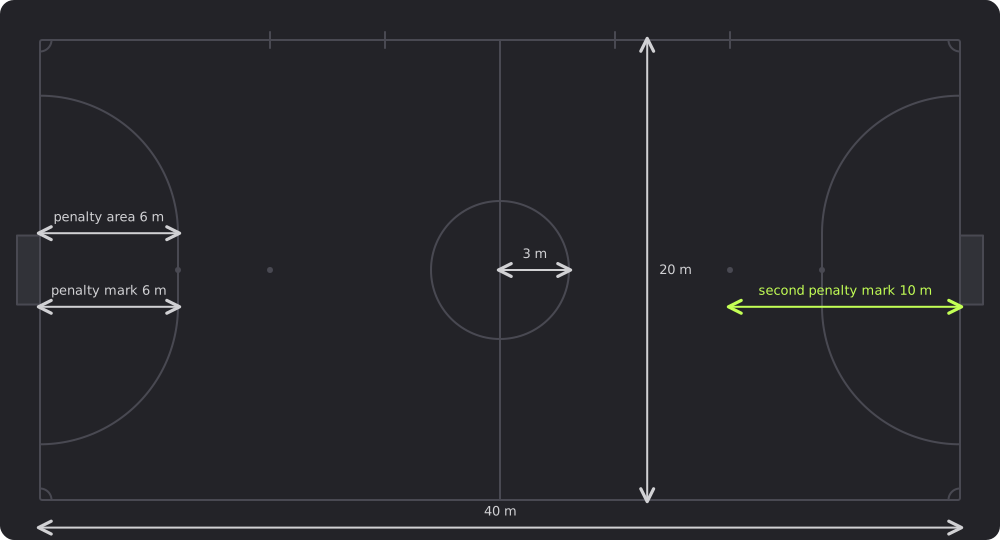
The futsal court: 40 by 20 m, the 6 m penalty area and marks, the 10 m second markA futsal court seen from above, 40 m long and 20 m wide, with a goal at each end. At each goal the penalty area is drawn as two quarter-circles of 6 m radius struck from the posts and joined by a short straight line, not as a rectangle. The penalty mark sits 6 m from the goal line and the second penalty mark 10 m out, both on the centre line of the court; the centre circle has a 3 m radius around the centre mark on the halfway line.40 m20 mpenalty area 6 mpenalty mark 6 msecond penalty mark 10 m3 m
The futsal court: 40 by 20 m, the 6 m penalty area and marks, the 10 m second mark. The penalty area is two 6 m quarter-circles; the penalty mark is at 6 m and the second penalty mark, used from the sixth accumulated foul, at 10 m.SVG

Level 1: Beginner · The Court and the Kit

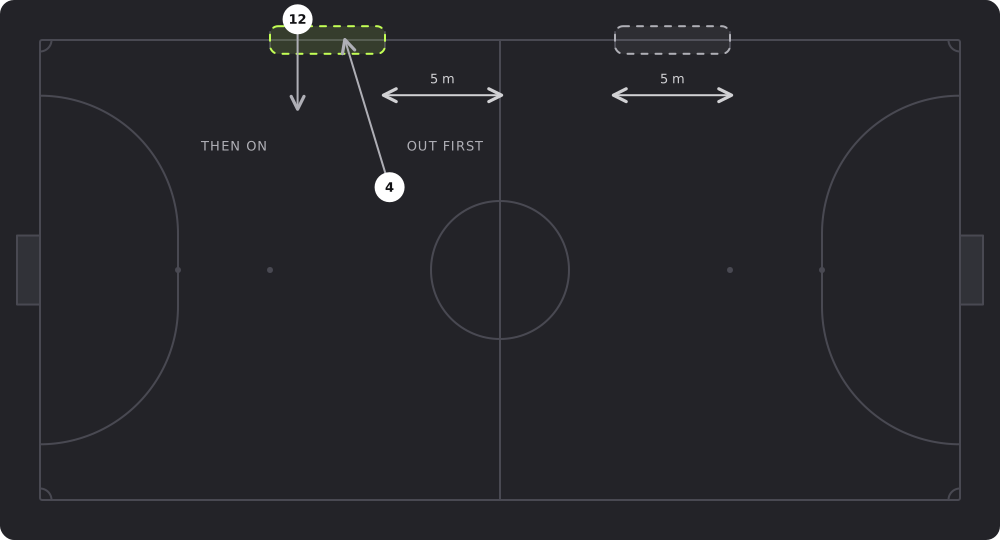
A rolling substitution through the team's own 5 m substitution zoneThe top touchline of a futsal court, the bench side, with a 5 m substitution zone marked either side of the halfway line and a 5 m stretch in front of the timekeeper kept clear between them. In the left zone the player wearing 4 runs off the court through the zone while the substitute wearing 12 waits outside the touchline; only once 4 has completely left may 12 step on through the same zone.4125 m5 mOUT FIRSTTHEN ON
A rolling substitution through the team's own 5 m substitution zone. Off first, then on: both players use their own team's zone, and the substitute waits until the player he replaces has completely left the court.SVG

Level 1: Beginner · Players, Substitutions and the Bench · Test 2: Rolling substitutions

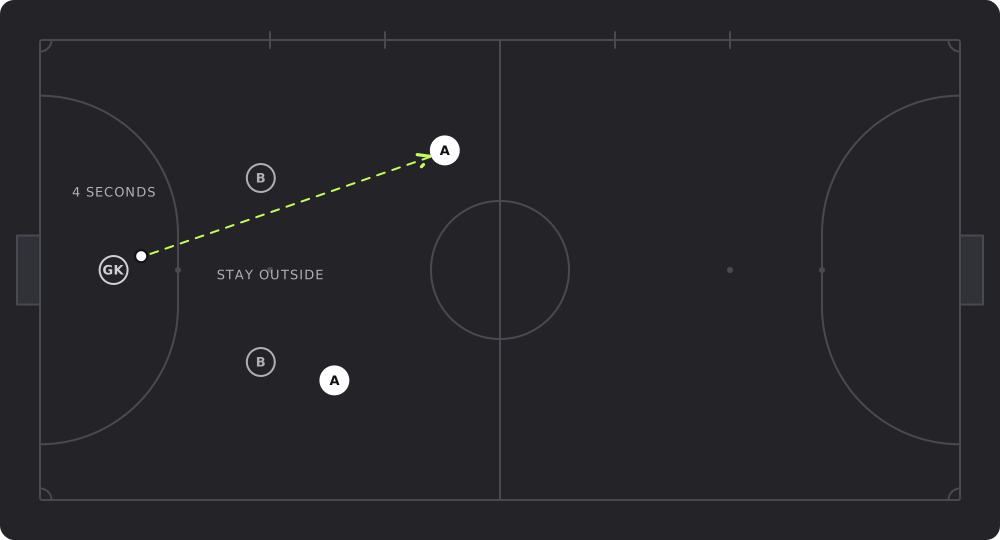
The goal clearance: thrown by the goalkeeper from inside his area within four secondsA futsal court seen from above, the goalkeeper in the left-hand penalty area with the ball in his hands. He throws it out of the area to a team-mate near the halfway line; the ball is in play once it has left the area. Two opponents wait outside the penalty area until the ball is in play, and a note beside the goalkeeper reads four seconds, the time he has to release it.GKAABB4 SECONDSSTAY OUTSIDE
The goal clearance: thrown by the goalkeeper from inside his area within four seconds. A goal clearance is thrown, not kicked, from anywhere inside the area within four seconds; opponents stay outside the area until the ball has left it.SVG

Level 1: Beginner · Scoring, Restarts and the Four-Second Rule · Test 3: The goal clearance

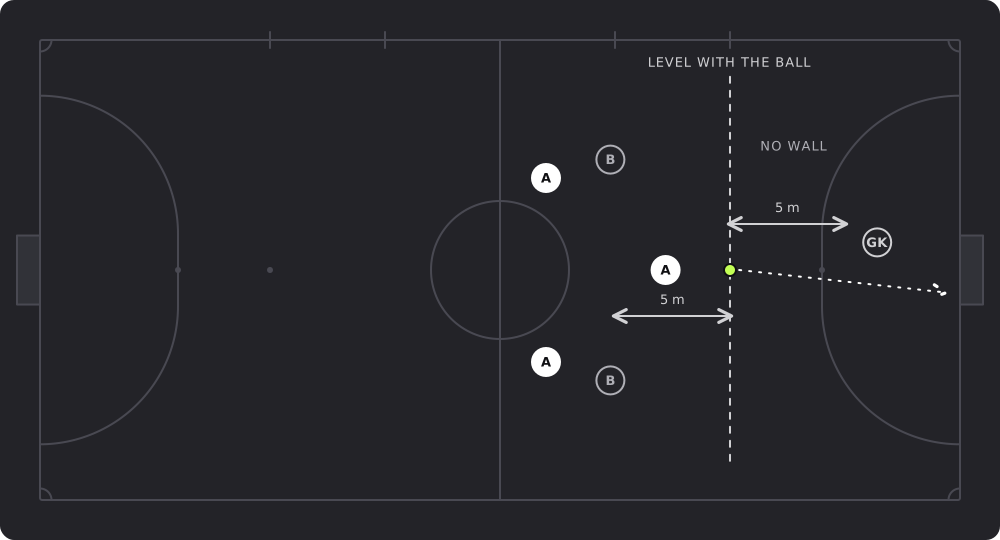
The sixth-foul free kick from the second penalty mark: 10 m out, no wallA futsal court seen from above, attacking the right-hand goal. The ball sits on the second penalty mark, 10 m from the goal line, with the identified kicker behind it shooting directly at goal. No wall stands in front of the ball: every other player waits behind a dashed line level with the ball and at least 5 m from it, and the goalkeeper stays in his own penalty area, also at least 5 m from the ball.AGKBBAALEVEL WITH THE BALL5 m5 mNO WALL
The sixth-foul free kick from the second penalty mark: 10 m out, no wall. From the sixth accumulated foul the wall disappears: the named kicker shoots from 10 m, everyone else is behind the ball and 5 m away, the goalkeeper at least 5 m off in his area.SVG

Level 2: Elementary · Free Kicks and Accumulated Fouls · Test 4: The Sixth Foul — No Wall

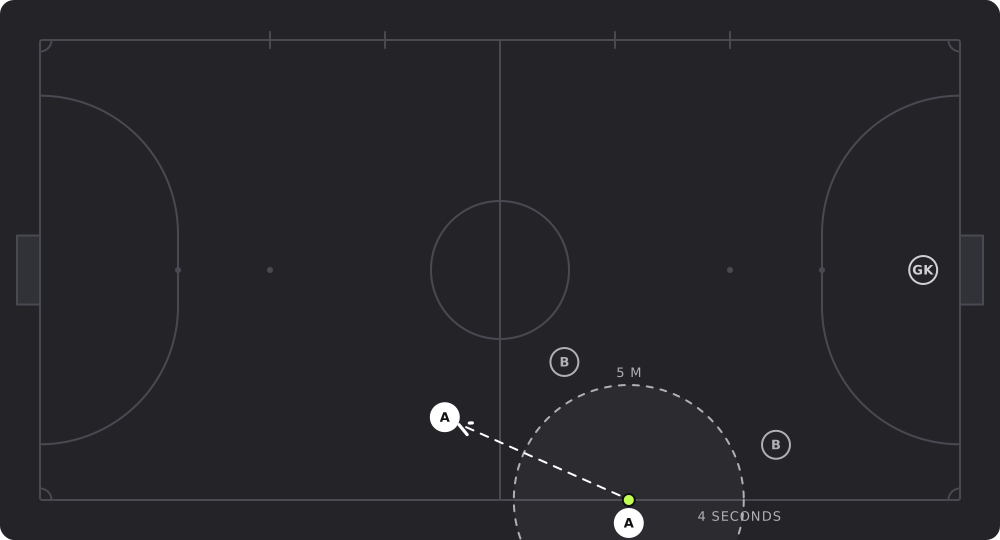
The kick-in: ball on the touchline, opponents 5 m away, four seconds to take itA futsal court seen from above. The ball rests on the bottom touchline where it went out and the taker stands outside the court with one foot on the line. A dashed circle of 5 m radius around the ball shows the distance every opponent must keep; two defenders wait just outside it. The taker plays the ball along the ground to a team-mate inside the court, and a note by the taker reads four seconds.AABBGK5 M4 SECONDS
The kick-in: ball on the touchline, opponents 5 m away, four seconds to take it. Ball still on the line, one foot on or outside it, opponents at least 5 m away, and the kick taken within four seconds of being ready.SVG

Level 2: Elementary · The Penalty Kick and the Kick-In · Test 3: The Kick-In — Procedure

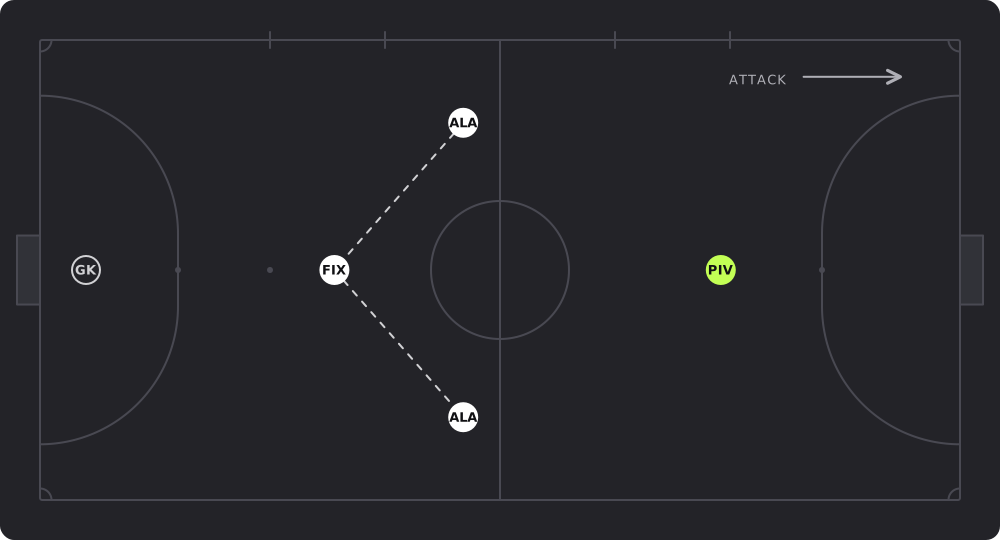
The 3-1: fixo and two alas behind a single pivôA futsal court seen from above, attacking to the right. The goleiro stands in the left-hand goal. The fixo (FIX) holds the centre of the team's own half with an ala (ALA) wide on each side a little further forward, the three joined by dashed lines to show the back three. The pivô (PIV) waits alone ahead of them in the middle of the opponents' half, back to goal, as the fixed target.GKFIXALAALAPIVATTACK
The 3-1: fixo and two alas behind a single pivô. Three across the back, fixo in the middle and an ala on each side, with one pivô ahead of them as the fixed reference point of the attack.SVG

Level 3: Pre-Intermediate · Positions and Formations

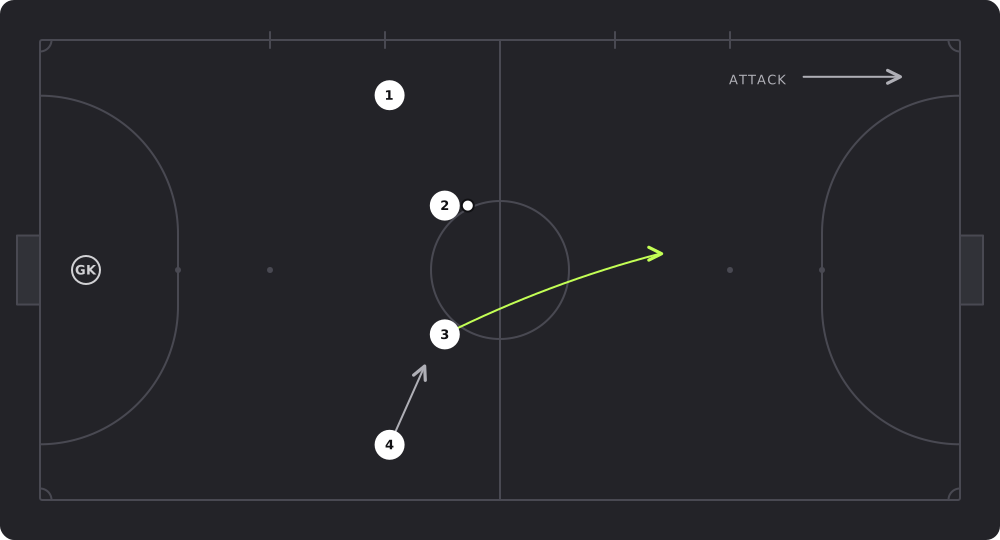
The 4-0: four outfield players in a line, rotating freely with no fixed pivôA futsal court seen from above, attacking to the right. The four outfield players, numbered 1 to 4, stand in a line across the court around the halfway line with nobody ahead of them; the goleiro is in the left-hand goal. Player 3 runs diagonally forward into the empty pivô space and player 4 moves up to fill the spot 3 left, showing how the four rotate through each other's positions rather than holding fixed roles.GK1234ATTACK
The 4-0: four outfield players in a line, rotating freely with no fixed pivô. No fixed pivô and no fixed roles: the four rotate freely, one running into the space ahead while another fills the position he left.SVG

Level 3: Pre-Intermediate · Positions and Formations · Test 2: Base Formations — 4-0, 3-1 and 2-2

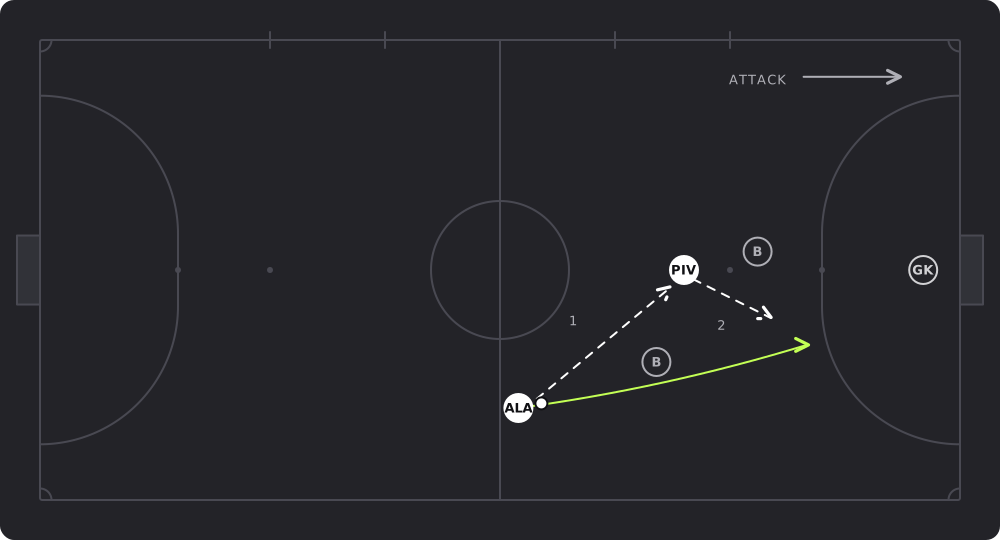
The diagonal give-and-go: pass to the pivô, cut behind the marker, receive the returnA futsal court seen from above, attacking the right-hand goal. The ala (ALA) on the right wing passes (1) into the pivô (PIV), who has his back to goal with a defender behind him, and immediately runs on a diagonal across and behind his own marker toward the goal. The pivô lays the ball back (2) into the runner's path, so the ala receives it goal-side of the defender who was marking him.GKALABPIVB12ATTACK
The diagonal give-and-go: pass to the pivô, cut behind the marker, receive the return. The angled run is what makes it diagonal: the passer cuts behind his marker rather than alongside him, and the return pass finds him goal-side.SVG

Level 3: Pre-Intermediate · Attacking Play · Test 2: The Give-and-Go — Parallel and Diagonal

Triathlon

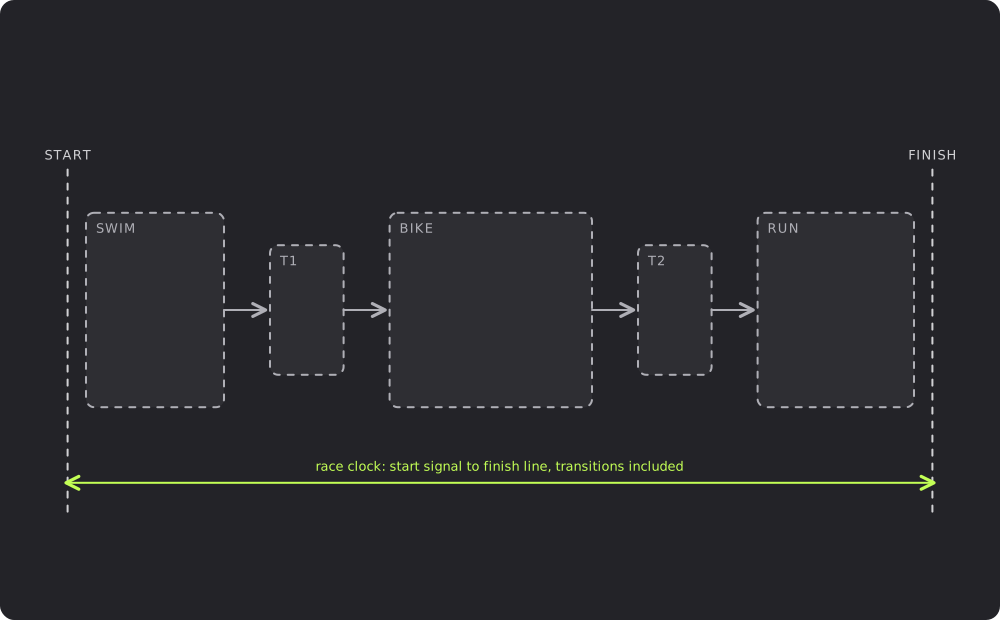
The order of a triathlon: swim, T1, bike, T2, run on one continuous clockA left-to-right flow of five boxes: swim, then the first transition T1, then bike, then the second transition T2, then run, joined by arrows. A dashed line marks the start on the left and the finish on the right, and a lime dimension line beneath the whole sequence shows the race clock running from the start signal to the finish line without stopping, so both transitions count.STARTFINISHSWIMT1BIKET2RUNrace clock: start signal to finish line, transitions included
The order of a triathlon: swim, T1, bike, T2, run on one continuous clock. The swim comes first while athletes are fresh; the clock starts at the start signal and never stops, so T1 and T2 are part of the result.SVG

Level 1: Beginner · Triathlon Basics

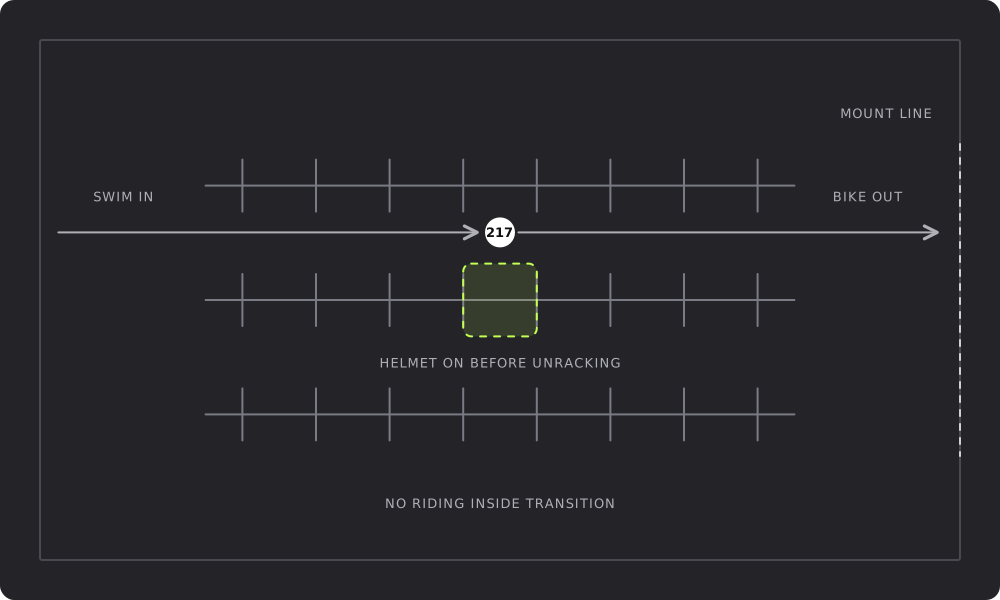
T1: swim in, your numbered rack space, bike out on foot, mount after the lineA transition area seen from above with three rows of bike racks. An arrow enters from the left marked swim in and leads along the aisle to the athlete's numbered space on the middle row, highlighted in lime with the note that the helmet goes on before the bike is unracked. A second arrow marked bike out leads right along the same aisle to a dashed mount line at the far edge, the first point where riding is allowed.217SWIM INBIKE OUTMOUNT LINEHELMET ON BEFORE UNRACKINGNO RIDING INSIDE TRANSITION
T1: swim in, your numbered rack space, bike out on foot, mount after the line. Fasten the helmet before the bike leaves the rack, run the bike out of transition and get on only after the mount line.SVG

Level 1: Beginner · Triathlon Basics · Test 7: Transitions T1 and T2

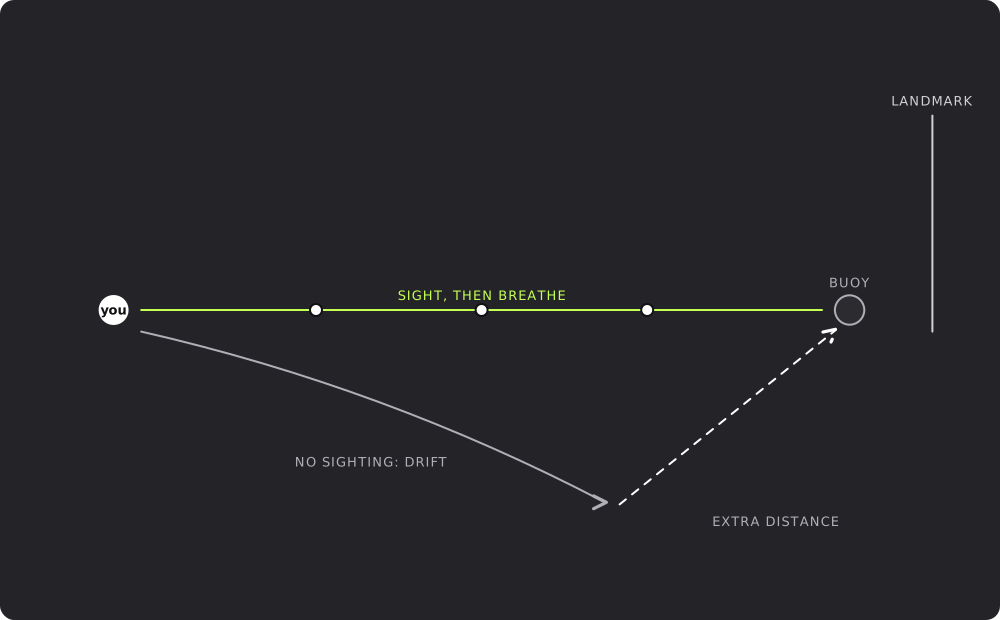
Sighting in open water: a straight line to the buoy and a landmark behind itA swimmer on the left and a turn buoy on the right, with a tall mast on the shore directly behind the buoy. A lime line joins swimmer and buoy with three sighting points along it, labelled sight then breathe. Below it a curved arrow shows the path of a swimmer who does not sight, drifting away from the line, and a dashed arrow shows the extra distance needed to get back to the buoy.youSIGHT, THEN BREATHEBUOYLANDMARKNO SIGHTING: DRIFTEXTRA DISTANCE
Sighting in open water: a straight line to the buoy and a landmark behind it. The buoy is small and low, so aim at the landmark behind it; a small heading error repeated for hundreds of metres is paid for in extra distance.SVG

Level 1: Beginner · Open Water Swimming · Test 1: Sighting and Navigation

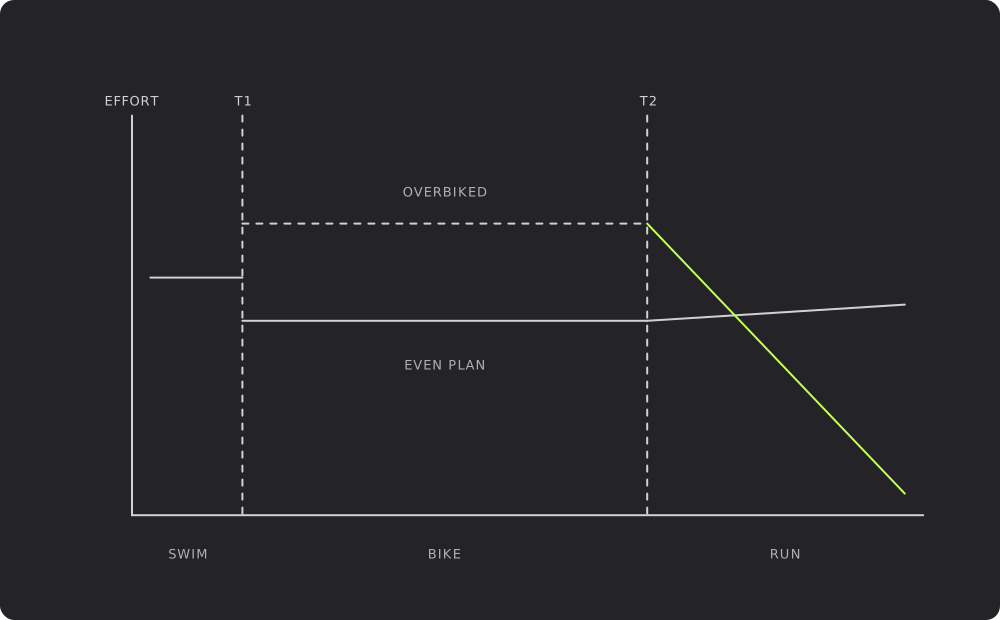
Even pacing against overbiking: the bill for a fast bike split arrives on the runA sketch of effort over race distance, divided into swim, bike and run by dashed lines at T1 and T2. A solid line marked even plan holds a steady effort through the bike and lifts very slightly on the run. A dashed line marked overbiked sits well above the plan on the bike, then turns into a lime line that falls steeply through the run as the effort collapses.EFFORTT1T2SWIMBIKERUNEVEN PLANOVERBIKED
Even pacing against overbiking: the bill for a fast bike split arrives on the run. Riding above the plan looks strong in T2, but the penalty for overpacing is non-linear and lands on the run, the leg where you are slowest and can least afford it.SVG

Level 3: Pre-Intermediate · Race Strategy and Pacing · Test 1: Pacing by Race Distance

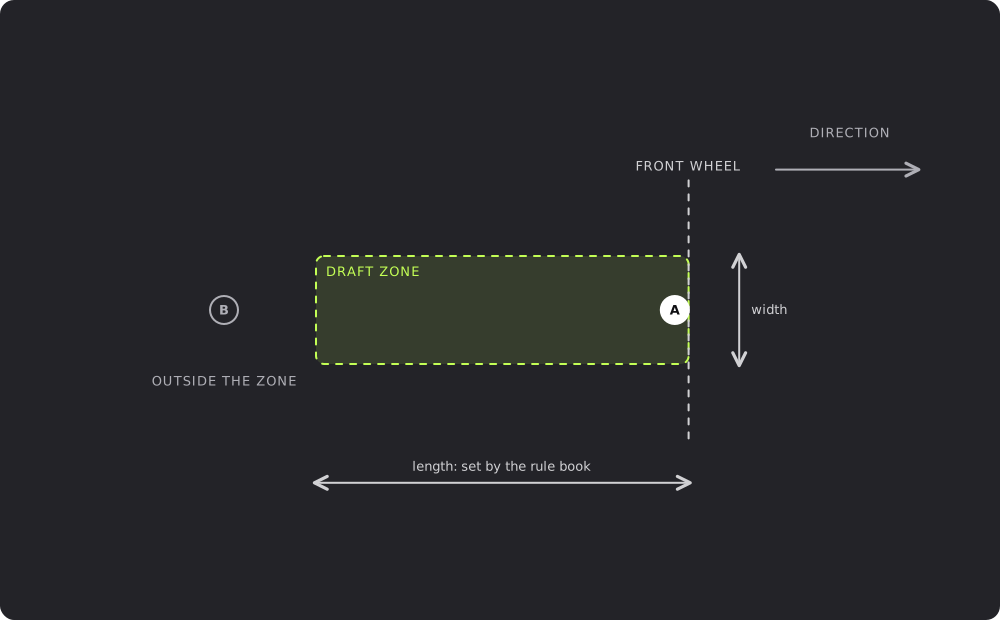
The draft zone in a non-drafting race: a rectangle measured back from the front wheelTwo cyclists seen from above travelling to the right. Behind the leading rider A, a lime dashed rectangle marked draft zone extends backwards from a dashed line at the front wheel. The following rider B sits behind the rectangle, outside the zone. Dimension lines mark the zone's length and width without numbers, because each rule book sets its own.ABDRAFT ZONEFRONT WHEELDIRECTIONOUTSIDE THE ZONElength: set by the rule bookwidth
The draft zone in a non-drafting race: a rectangle measured back from the front wheel. The zone is referenced to the leading rider's front wheel; enter it only to overtake, and check your race's rule book for its length and width.SVG

Level 3: Pre-Intermediate · Race Strategy and Pacing · Test 3: Non-Drafting Bike Tactics

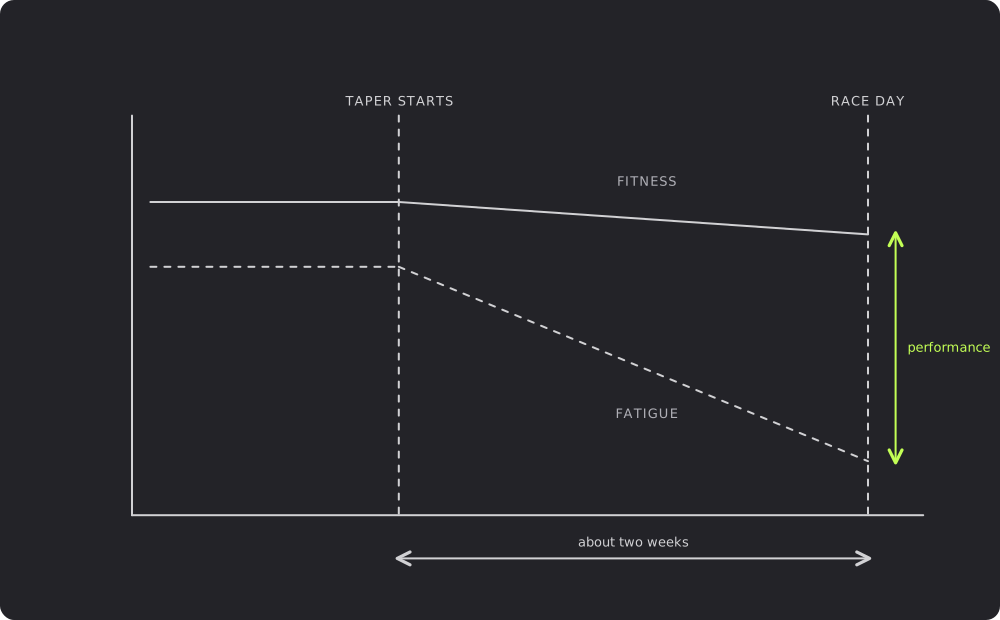
The taper: fitness and fatigue both fall, but fatigue falls fasterA sketch over the three weeks before a race. Two horizontal lines run level until a dashed marker where the taper starts about two weeks out: a solid line marked fitness then slopes down only slightly, while a dashed line marked fatigue drops steeply. At the dashed race-day line on the right a lime dimension arrow spans the widened gap between them, labelled performance.TAPER STARTSRACE DAYFITNESSFATIGUEperformanceabout two weeks
The taper: fitness and fatigue both fall, but fatigue falls faster. Reducing training lets fatigue clear much faster than fitness fades; the gap that opens by race day is what unmasks performance, and around two weeks is the best-supported average taper.SVG

Level 3: Pre-Intermediate · Peaking, Recovery and Injury · Test 1: Taper Science